Monday, January 29, 2018

100 Days of School Shirt using Siser Glitter Heat Transfer Vinyl

Photo credits: Darci S.
This darling 100 Days of School Shirt post was done by Darci S. Darci is another talented Craft Chameleon FaceBook Group member. Now let's see how she made this shirt!
Supplies Needed:
* Siser Glitter Easy Weed - Black
* Siser Glitter Easy Weed - Blush
* Siser Glitter Easy Weed - Cherry
* Lips SVG file (free with CC Acrylic Blank Lips -$.90 for both a file AND cut file)
Shirt

Add the Lips SVG file to your design program. Choose a font you like to create the text, “Kissing 100 days of school goodbye”.  I used a size 6 girls shirt, so my design was about 6” wide by 7” high.  Next, size the lips SVG to about 1 1/3” wide by ¾” high.  Duplicate to make 50 lips. 


You will cut 50 in blush and 50 in cherry HTV.  Mirror (flip horizontally) your text design.  Separate your design by color and cut your design with the HTV shiny side down (I use a mat).  The default cut settings for glitter HTV worked well for me. 


Cut your text from black HTV and then cut the lips from cherry and then from blush HTV.

Weed your designs by removing the excess HTV from the clear carrier sheet leaving only your design behind on the carrier sheet.  


Place the text in the upper middle area of the front of the shirt.  Manually cut each of the lips apart so you can place them on the shirt scattering them around the arms, front and back of the shirt. 


Once the HTV is placed on the shirt it is time to press with either an iron or a heat press.  I pressed for 15 seconds at 320 degrees Fahrenheit with my Cricut EasyPress.  Remove the carrier sheet right after pressing each area.  


Now you have a beautiful fun shirt for the 100th day of school!
Remember,  you have the lips acrylic blank that the svg file came with.  You can also make a matching keychain or bag tag with your remaining Glitter HTV and by adding hardware from CC.  See previous blog post on adding HTV to acrylic blanks

Thank you Darci, this a fantastic post!

Friday, January 26, 2018

Burlap Pillow Cover Tutorial for Valentine's Day

Burlap Pillow Blank using htv for decorating your home on Valentines Day
Photo Credits to Renee Crowe


Today I would like to introduce Renee Crowe as our guest blogger!  We are so pleased to have her show you how to use one of our burlap pillow covers and htv to fashion some seasonal Valentine's Day decor!

Supplies Needed:
*Burlap Pillow Cover from Craft Chameleon
*Glitter Heat Transfer Vinyl from Craft Chameleon
Pillow or pillow insert
Heat PressSilhouette Cameo and Studio Software or Electronic Cutting Machine (Cricut, Scan n Cut) with coordinating software
Items  with * are links to Craft Chameleon products


Ready to design my pillow cover, I went to the Silhouette Store. I selected the Tree Trunk with the heart for my Valentine's theme.

I wanted a font that had hearts in it, so I headed over to dafont.com. They have thousands of freeware/shareware fonts. So I searched and after choosing the Heartland font, I downloaded it to my computer.

Now to start my design. I decided to do my tree trunk in brown htv and my words in glitter htv. I kept it simple using only two colors.

My husband always tells me that he loves me forever and a day so I used that saying. I turned my heat press to 300 degrees and so it would be heating up.
I cut my design from my vinyl (remember to always reverse the design when you are using HTV).
After cutting my vinyl I arrange it on my pillow cover. When using both glitter HTV and regular HTV remember they have different temperature setting so make sure you remember that when cutting.
 Personally I like to do my colors one at a time, so first I do my brown and then heat press my pink. I use a Teflon sheet to cover my vinyl and heat press for fifteen seconds. To place the vinyl. Repeat for the glitter words. Then follow the manufacturers' instructions to complete the press.

Craft Chameleon has a facebook group were all the members share tips and tricks for heat pressing on burlap. Join the group here and be sure to answer the questions to get in!

I use a pillow form for the inside of the pillow and now it is ready to use. 

Easy and cute décor for Valentine’s Day!


Wednesday, January 24, 2018

SuperBowl Party Favors ~ Coin Keychain and Cuff Bracelet

All photos by Roy Robinson

Coin Keychain and Cuff Bracelet SuperBowl Party Favors

This blog post is from Roy Robinson, the only guy who blogs with us. He is so talented and we are blessed to work with Roy.  Enjoy this great post!

*Ballchain Keyring (these come with the sets of 5 circles too)
*Heat Transfer Vinyl (HTV)
Brown Work Glove (like those found at Dollar Tree)
Heat press- preheat to 300-310
Items with * are links to the CraftChameleon products.
Create your designs. While these favors were designed for a SuperBowl Party you could easily design them for awards partys, birthday party's, the list is endless.

After cutting your HTV, it's time to weed. A tip I have found to make weeding a little easier, try slightly heating your htv on the bottom platen of your heat press.

Fold a piece of parchment paper in half and then half again. Place on bottom platen of heat press.

Peel the protective paper off both sides of the 2 inch circle. Place inside the fold of the parchment paper, put htv in desired place on the circle. Making sure top fold of parchment paper is covering
 the circles.
With light pressure press the circle for 5 to 12 seconds. This may take a few tries depending on your heat press and if you are using multiple layers. Repeat if doing both sides.

If there is htv covering the design, use the diamond tip reamer to clean out the hole. This will leave a clean professional hole for the attachments we will use next.

Now we are ready to apply the hardware. Gather your pliers, triangle bail, swivel lobster clasp and short ball chain.

Use pliers to open triangle bail. Hook it thru one of the coins (2 inch acrylic disc) and the swivel lobster clasp. Take pliers and close the triangle bail.

The second coin (2 inch acrylic disc) use the ball chain. Just feed one end of the short ball chain thru the hole and then connect. This is a no tools required method and the ball chains are included with the  acrylic discs.


Now for the Cuff Bracelet 
You will use the same heat press settings and craft paper from the coin project. This time you will need your brown work glove or other glove that can withstand heat and not leave marks. First be sure to remove the clear protective film on both sides of the cuff acrylic blank. If you leave them on you will have a mess.

Place acrylic right side up and add your htv, press 5-12 seconds and carrier sheet, each time placing the acrylic print side down. This is only if you want a shiny finish to your acrylic. The heat from the press (top platten) will create a matte finish on the acrylic.


Once you have all the htv in place and carrier sheets removed, flip your cuff upside down (for a  shiny finish) put on your glove. Place your cuff form in easy reach.  Then press with light pressure for 30 seconds.  
C A U T I O N:  THE ACRYLIC IS VERY HOT WHEN YOU PICK IT UP OFF HEAT PRESS
Wrap the flexible acrylic cuff around the cuff form making sure to center the opening on the back. The cuffs come in various sizes so depending on the size you have, your ends may overlap. Hold on form until cooled. Remove from form and adjust while still warm.  


I pray everyone enjoys my first ever blog. BLESSINGS to all.

Roy Robinson

Saturday, January 20, 2018

Super Simple, Super Cute, Super Bowl Tic Tac Toe Part 2

Faye Mitchell, who brought us Part One of this blog post is 
back with Part 2. Take it away Faye!

Even though I’ve finished my Tic Tac Toe Game board and am able to play, I’m not completely done. I want to keep my board and pieces together, so here is my storage solution. Craft Chameleon sells these cute little natural canvas bags that fit the game boards with pieces perfectly.

If you’re like me you want your little storage bag to be just as cute as the game board you’re putting inside of it.  In order to do this you will need a few things along with the natural canvas bag.

You can always use HTV, but not everyone has access to a heat press. So here is an alternative method using fabric paint.

Initially I was going to use fabric markers to label the bag and add another tic tac toe cross hatch game space on the front of the natural canvas bag.  I quickly changed my mind after I saw how badly the “non-bleeding” fabric markers were actually bleeding. Plus a second game board seemed redundant since I had a super cute game board stored inside.


After making this decision I went with a new design plan and painted a green square on the front of the natural canvas bag.  Thankfully the fabric paint did not bleed like the markers did.  You could use a stencil to create this square but I just freehanded it. It was a rare moment in my life where I wasn’t focused on making sure it was an absolute perfect square.  

While that was drying I went back to design studio and created a stencil of what I wanted my title to be.  Using some scrap vinyl and reverse weeding I created my stencil which I laid on top of the green square and carefully dabbed my chosen colors in the various spots.  


Once it dried some I removed my stencil and did some touch ups. Then I freehanded both the football stitching and 'VS' onto the football. After that I was done! 


Now I have a Super Cute, Super Bowl Tic Tac Toe Game board with coordinating pieces and storage bag.


Tuesday, January 16, 2018

Super Bowl Super Simple Super Cute

Acrylic Foot Ball Helmet blanks for vinyl and Football acrylic blanks for vinyl
Photo credits : Faye Mitchell


Hi Everyone, It’s me, Faye Mitchell and I’m back with another guest blog posting.  This time I’m making a Super Bowl themed Acrylic Tic Tac Toe Game Board Set using the amazing products you can purchase from the Craft Chameleon.


Items needed:
Transfer Tape 
* SVG Design Program
Vinyl Application Tool
Fabric Paint or Fabric Markers
Paint Brushes

Items listed with an * are clickable links.


The first thing I did was make a template of my game board in Silhouette Studio Designer Edition so I make sure the colors I chose looked good together and so I could add the wording to the board around the tic tac toe board.

I did this by drawing a 3.5” x 3.5” square.  I then added the tic tac toe board digital file, provided  by Craft Chameleon in your order's shipping notification, onto my square.
Tic tac toe vinyl design for acrylic blank game boards with Super Bowl theme

Once I got my tic tac toe board onto my square, I resized it slightly since I wanted to add some words around the outside edge.  I did this by just clicking on the board and using the resizing squares to drag it in a little bit smaller.  


Once I had it the size I wanted it I used the text feature in my design studio and added the words to the board.
  I used the font Junior Varsity from the Silhouette Design Studio Store.  Not seen in the photo but I also put LII in the center box since it is the 52nd super bowl this year.


With my board designed, I started working on the designs for the game pieces. these are ordered as charm size with no holes on the Craft Chameleon website.

Since it is still early, so I don’t know which teams are going to make it to the super bowl, coupled with copyrighted team logos, I decided to keep it simple. My super bowl super solution?  I went with the AFC vs. the NFC for my game.  I decided my AFC team would be represented by the Football Helmet charm and the NFC would be represented by the football charm.

* Smooth brown glitter finish is on one side only.

With all my designs all created, I started to cut the vinyl. You may notice that my vinyl pieces were super tiny but they cut like a dream using the CB09 blade kit (60 degree blade) from Craft Chameleon. 

I did all my cutting at once and worked on weeding each color while the next color was cutting.  It saves time and  works best for me. 

To save vinyl I put my white football laces in the middle of my tic tac toe board and went ahead and put them onto the football charms using my weeding tool instead of transfer tape prior to taking this photo.

After all the pieces were cut and weeded I started the assembly process.  This is when it starts getting really fun because you can finally see the design come to life.  I personally started with the game board and put the words on first followed by the tic tac toe cross hatch with the last step adding the LII. You could also personalize with a name or monogram too!


Once I had my game board completed I needed to get my pieces done.  I decided since I had already done part of the football charms I would go ahead and get them finished first. 

Before applying any vinyl,  take the protective plastic off the acrylic charm blanks or you’ll be spending extra time re-cutting your vinyl  Then to place the vinyl, use
 a small piece of transfer tape to pick up the NFC wording and place it carefully onto the footballs.


Onto the “AFC” Football Helmet Charms!  Assembled using the same methods as the footballs by using a small piece of transfer tape to apply the AFC wording . Repeating the process to put the red face mask pieces onto the charm.
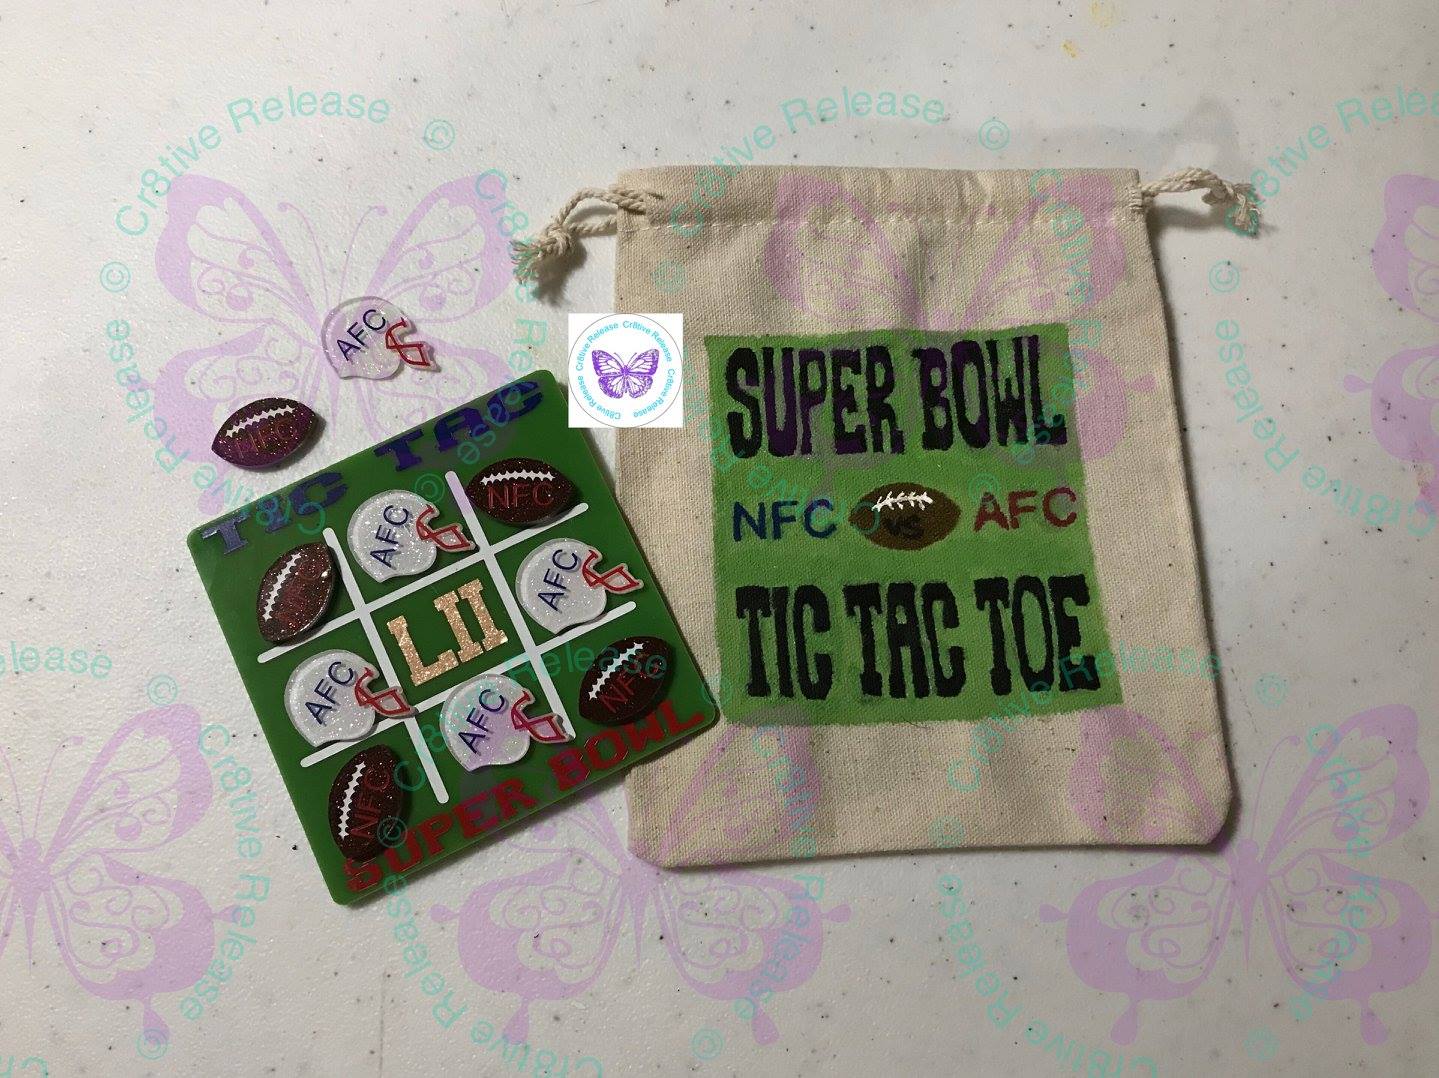
TaDa! My board is complete and I’m ready to play some super fun, Super Bowl Tic Tac Toe.


Come back on Saturday and I will show you how I made this darling bag to keep the set in!