Showing posts with label acrylic blanks for crafting. Show all posts

Wednesday, September 12, 2018

Baby It's Organized In Here! - Gorgeous Blank Acrylic Closet Dividers Tutorial - Personalize with Vinyl - Use Our Free File or Create Your Own

Hey guys Jennifer here as this weeks guest blogger!  I'm excited to share this project because it's something I found very useful and also fun to make! My baby girl will be here any day now, and these closet dividers are perfect for organizing all the clothes from baby showers and thing I have picked up throughout my pregnancy. So let's get started!

Materials Needed:
* items have links to the Craft Chameleon items
*Oracal Vinyl
Transfer Tape
*Acrylic Closet Dividers with free designs
Alcohol Wipes (optional)


This is a fairly easy project and is perfect for someone wanting to learn how to use several colors of vinyl at a time. When you purchase the product, Craft Chameleon sends a few different digital files for boy themes and girl themes, but you can create your own using their files for sizing help.

Since I am having a girl (and I am from south Alabama), I decided on the girl themed chevron and polka dots with space for a monogram. I removed the designs I didn't want to use and was left with pieces I needed.

REMEMBER- the files are perfectly sized for the acrylics so do not resize them if you are using the Silhouette Studio software. For those of you using Cricut Design Space a png is included in the files for sizing. Video here.


The only extra things I added to the design were a monogram and the numbers for the clothing sizes. Make sure you remember to size the monogram and clothing sizes for your design! 


Once this is done, make 5 copies of each shape for your acrylic closet dividers. I wanted to cut all the colors at the same time, so I arranged them on the screen in a way that I could run the mat through as few times as possible. I did have to run the mat through a second time for the last polka dot pieces and the numbers for the clothing sizes. 


Cut vinyl to size using a paper cutter (good old fashioned rules and scissors work too), then place the vinyl on the mat to match the screen. REMEMBER- don't mirror your sticky vinyl and the color goes on top. 


Once all the pieces are cut out, weed each one and cut them out so they can individually be applied to the acrylic.


I forgot to snap a photo, but the acrylics have a clear protective film on each side that needs to be removed before you start. I also like to clean the acrylic with an alcohol wipe to take off any grime that may have gotten on there and to ensure my vinyl sticks as well as possible.


Using the transfer tape, take one piece at a time and layer it on the acrylic. This can be a bit tricky, but take your time. It is worth so worth it!


Once you have applied all your pieces to the acrylics, you're left with 5 precious closet hangers that are personalized! 


Since these were made for personal use and babies grow up fast, I plan to remove the numbers as she gets older and replace them with new sizes. They would also be great to use in children & tween's closets separating trousers and jeans and blouses, tees and dresses. 

A big thanks to Jennifer for this weeks tutorial! Remember sharing is caring, so we have provided 2 images to share on social media or Pinterest.

Craft Chameleon Blog tutorial
Share on your favorite social media.


Craft Chameleon Blog
Pinterest sized image.


Wednesday, July 11, 2018

How to use htv on Neoprene Popsicle Holders and Sea Shell Bag Blanks


Alyssa Cardin is back with two fun and easy summer projects, Popsicle Holders and Seashell Bags. Take it away Alyssa!

Before we begin with the popsicle holders I wanted to take a minute to show you the difference of the popsicle holders you get with Craft Chameleon vs. the ones you might find elsewhere. The ones from Craft Chameleon are much better quality and will fit a wider and longer pop.


The blanks you will need from Craft Chameleon are the Popsicle Holders which come in an array of colors and styles and the Seashell Bags. These bags come in pink, aqua blue, navy and lime green.

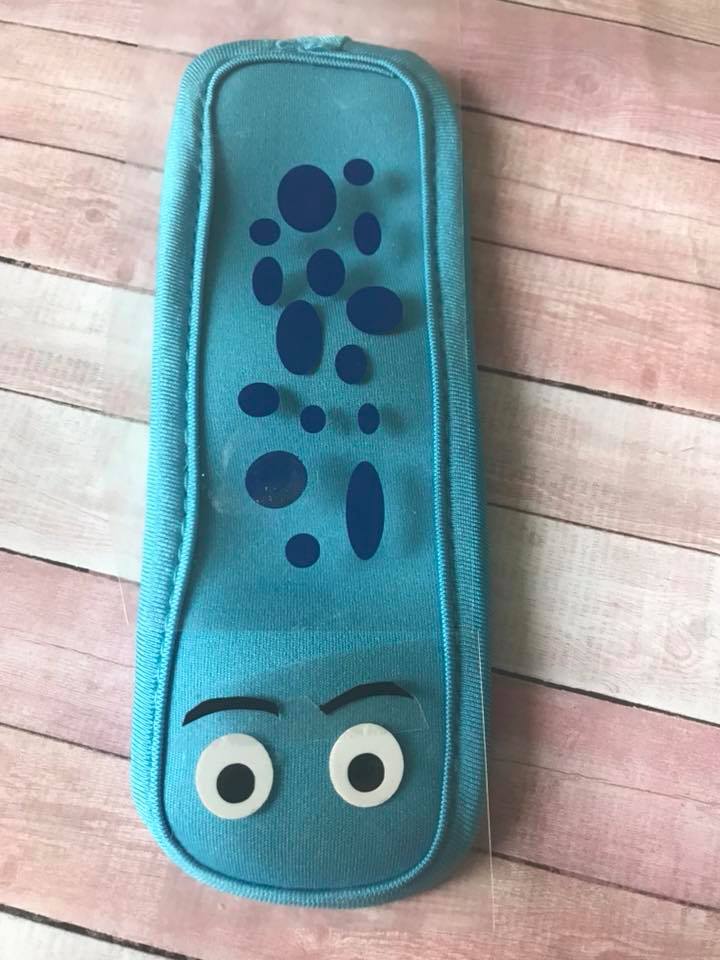
Okay - let's Begin. I made two designs for the Popsicle holders. One to resemble a crayon and one to resemble a reptile like animal, so when you put the popsicle in place it looks like a tongue. Craft Chameleon also sends designs that can be downloaded and used with the popsicle holders.


Decide on the design you want to use and either bring it into your design program or design it there from Scratch. Size your design to fit the popsicle holder, remember there is an edge so you want the design to fit in the flat section.


Reverse your design and cut using HTV. 


If your design has multiple colors you will need to cut each color separately and then layer when pressing.


Weed your vinyl. Place the vinyl on the popsicle holder, if multiple colors you will press one color at a time with the bottom layer being first.

Make sure to fold the vinyl under the edge before pressing if the vinyl overlaps. Press according to the vinyl's instructions.

 Now you have yourself a fun popsicle holder, and maybe a slightly less messy kid!


The seashell Bag is just as easy, and everyone loves these - kids and adults! 

The most difficult part of the seashell bag is paying attention to the size and pressing without the sides of the handles in the way.

Decide on the design for this project.  I recommend not making it longer than 10 inches in length and 2.5 inches in width. 

Size the design and mirror horizontally since we will be using HTV. 

Cut the design and weed HTV.

Pressing the vinyl is the tricky part if the vinyl is close to the edge. A few tips - a mini iron, hair straightner, or a hand iron might give better control for pressing this item. If using a heatpress, angle the bag on the press so the strap next to the design is off the press or place a teflon sheet, or a tshirt folded inside the bag to raise the area that will be pressed. This will allow the pressure to be applied to the design without being blocked by the handle.

Press for the recommended amount of time and temperature. Remove HTV masking. In no time at all you have created a wonderful seashell bag. This bag is also useful for collecting rocks, putting small sand toys in, and for carrying sandy shoes. 

Have a Happy Summer!

PS Please remember to pin or share our blog post!


Friday, March 23, 2018

3 DIY Wedding Gift Tutorials for Gifts That No One Will Believe You Made! Part 3 of 3

Today we will finish up our wedding gifts by etching coaster using our curio. But remember the files you get can be used to cut faux etch vinyl with your cameo, so you are not left out!


Let's gather up our supplies, open the files and get started.


Supplies:Items with * have a link to the Craft Chameleon products

  SVG Design Program ( Studio, Design Space, SCAL, etc)

  Silhouette Curio

  Standard Curio Tray

* Double Sided Tape - optional


I used the plastic coaster template which gives the ability to etch 2 coasters at a time with precision alignment. Also, your mat gets less sticky over time and the templates will help keep your acrylics from moving. Once the template is opened in the design program you will need to center it to the page. This video shows centering the template if you would like extra details.


Time to build your platform will use 2 layers marked 2 and the gridded layer marked 1.   


Then you put your craft chameleon template down making sure the word Front is facing the correct way so that when you put your coasters down they are in the correct spot to etch.


I recommend leaving the backing on one side of the coasters to help them stick to your mat.  Sometimes I use a little bit of double-sided tape to make sure the item I’m etching doesn’t move while etching.  You don’t want it to move or it can mess up the etching process.  


Since I wanted my coasters to correspond with the wine caddy butler and wine bottle stopper I once again opened up the wine caddy butler design provided by Craft Chameleon when I purchased the wine caddy butler from them.  


I ungrouped the design and just took the center portion of the design and placed it in the center of the coaster etching template opening. 


I thought it needed a little something more so I opened my text tool and picked a font that I thought looked good with the grapes.  I went with Brush Script MI.  I typed Cheers and angled it so it was diagonal through the middle of the coaster.  Depending on the font you may want to thicken it and or make sure you weld the letters together.

After completing the design, flip it horizontally as the design is etched on the reserve side of the coaster. Be sure not to flip the template. Duplicate the design and paste it into the second coaster template slot.


Now it’s time to set up the etching portion of the file.  Select your designs and open the embossing panel.  Choose the deboss option,  select the pattern you want to use.  I picked the crosshatch embossing pattern this time.  Adjust your spacing and angle.  I leave the angle at the predetermined setting but I adjust the spacing to the most fill which is .004.  


You’ll notice when you do these adjustments the design will change to a light blue color and show what the etching lines will look like.


The design should turn a darker blue color showing it is designated to etch.  You select your material and make sure your action is set to 'etch' and the etching tip is the blue tool holder.  Choosing to etch edge will not etch the whole design and just the edge.


Now for the fun part! Etching your coasters.  Click the send button towards the bottom and the curio will etch both coasters!  Once you complete these two you will need to repeat the steps again so that you have a complete set of four coasters.


Well, I hope you enjoyed making these wedding gifts as much I did. If you have more questions, join our Facebook Group where we have lots of curio users. This is the link and be sure to fill out the questionnaire. Tell Peggy, Faye sent you.  ;)


Thursday, March 22, 2018

3 DIY Wedding Gift Tutorials for Gifts That No One Will Believe You Made! Part 2 of 3

Hello! Faye here back with the second part of our Wedding Gift Tutorials! Today we will make the Etched Wine Caddy and be using our Silhouette Curio. No Curio? Don't despair you can also use your regular vinyl cutting machine to make this item by using the same etched vinyl that was used to make our bottle stopper yesterday.


However, I love to etch so this is the method I used to etch the wine caddy. I recommend having the large tray that Silhouette has for their Curio.  It can be done using the small tray and Peggy Flannigan will be doing a video to show everyone how that is achieved. But since I had the large tray I made my life easy!

Start the same way you would any project, gather up your supplies and open up the files.

Supplies:
Items with * have a link to the Craft Chameleon products
  SVG Design Program ( Studio, Design Space, SCAL, etc)
  Silhouette Curio
  Large Curio Tray
* Double Sided Tape -optional


To start set your page to show the large curio cutting/etching mat tray instead of the standard cameo view.  


Then open up the Wine Caddy cut/etch design file that Craft Chameleon includes with the purchase of the wine caddy butler acrylic blank.  When the file opens it opens horizontally.  In order to make it fit on the mat, rotate 90 degrees. 


After it is rotated, place acrylic on your mat* and line up the design on your screen so they are in the identical spot on both the screen and mat. Leave the backing on the side that will be the bottom. If your mat is well loved you may need to secure your acrylic in place with double-sided tape. Craft Chameleon's tape is flat out awesome. My mat is new so I was good to go!

*Mat Set up is as follows: Use 2 of the layers marked 2 and the gridded layer marked 1 for a total of 5. 


After the design is rotated and aligned with the acrylic on the mat, choose the design file and then open the emboss panel.  


In that panel select deboss, select the pattern and select the spacing density you want.  I chose the circular pattern and adjusted the spacing with the smallest setting of .004. The angle doesn't change with the circles so no need to worry that setting.


When you complete these settings your image will turn red or blue. Now up to the top right-hand corner to select send. Don't worry it actually takes us to the material/blade set up. 


When etching you need to have an etching blade.  I personally use the cb09 blade holder and etching blade from Craft Chameleon.  I also use tool slot number 2 which shows up blue on the curio screen when etching.  You’ll need to select your material. 

Most crafters will have to add the acrylic material type so here is the Craft Chameleon YouTube video link walking you through step by step on how to do this and the etching process. Start around the 9:30-minute marker to get the settings for cutting acrylic. The video shows version 3 of the software. 


I already have acrylic programmed into my curio so I didn’t have to set it up this time. Here are my settings in version 4.


You’ll notice that once you select etch all your lines turn from a light blue color to a dark blue color.  At this time you’re ready to hit send and away goes your curio etching the acrylic wine caddy butler for you.


Now comes the fun part!  You are ready to hit send at the bottom of the page and away goes your curio etching the acrylic wine caddy butler for you. Don't forget to breathe!


Etching time?   I believe it took about half an hour.  I didn’t do it but I believe the next time I would pause the etching part way through and clean my blade. I think there was a little bit of build up towards the end which caused some small scratches to the surface.  Even if you don’t do this the scratches I noticed were next to impossible to see and you end up with a beautifully etched wine caddy.


The last installment of this weeks DIY Wedding Gift Tutorials will be tomorrow! See you there!