Monday, September 19, 2016

Hooray! Football Season is Upon Us!

Please welcome Martha D. as our guest blogger today. She is so creative & is graciously sharing her talent with us today!

First I would like to thank Jamie for asking me to be a guest blogger - it is such an honor! By the way my name is Martha and if you are like me then you are super glad that football season is FINALLY here! What a better way to show off your team spirit then with some jewelry – a football charm necklace!

Supplies I used:

I first made the crystal charm. I took the silver ball point head pin and threaded the rondelles and crystal bead.
Once they were threaded I bent the wire at a 90°. Then take your pliers and bend the wire into a loop, cut off excess of wire and close the loop.


I then cut out the lace for the football out of white glitter HTV – 1.5” x .75” – and the number to 3/8 of an inch by ½ an inch long with my Cricut.
 

I placed the lace on the football, covered with parchment paper and pressed.  BTW, the lace files for the necklace I am sharing here!
 *** Repeat this step for the quatrefoil charm. ***


Once football and quatrefoil are pressed or Oracal 651 vinyl has been placed we are ready to assemble.


Open one jump ring and join the necklace with the football. Close jump ring.


Repeat on the other side.
Next, place a jump ring on the crystal charm and another on the quatrefoil charm. Close them up. Now use another jump ring to join the charms together with the necklace – that’s it!


All that is left now is to show it off!
Have fun creating!
Martha

Friday, September 2, 2016

Your Christmas Gift List Completed!


Yes your Christmas gift shopping is done with these fabulous holiday/family acrylic boards! Make one for every family on your list!

Available with 2, 3, 4, 5 and 6 holes, in silver 2 sided glitter, gold 2 sided glitter and clear. Our 2" Deco Styled Ornaments are available along with our 2" paws so all the family can be included.

Hurry supplies are limited!

Tuesday, August 23, 2016

Did you know? 1 5/16" necklace blanks and so much more!

Did you know we just added 1 & 5/16" necklace discs to the website? Did you know can make it all to match? 2 styles of necklaces, 4 types of bracelets, a ring, 2 types of earring (post and dangle), tons of colors, great prices and all in one place!

Now you do and it's
www.craftchameleon.com!!!

Thursday, August 18, 2016

Free Gift with Order through 2016!

Flat Leon is having so much fun selecting and giving gifts, it was decided - free gift with purchase for the rest of 2016!

Saturday, August 13, 2016

Beautiful Acrylic Bookmark with Crosses


Hi Everyone, I’m  Faye Mitchell and truly excited by Jamie’s request to make a guest blog post.  I’ve decided to make a fancy charm and bead bookmark using mostly Craft Chameleon supplies.  A few items have come from other stores.


Items needed:
Acrylic Bookmark - Craft Chameleon
1.5” Acrylic Cross - Craft Chameleon
15/16” Acrylic Circle - Craft Chameleon
Lobster Clasp - Craft Chameleon
Triangle Bail - Craft Chameleon
Jump rings - Craft Chameleon
Extension Links - Craft Chameleon
Tassels - Craft Chameleon
Charms - Craft Chameleon (not pictured)
Beads
Headpins
SVG Design Program
Vinyl
Jewelry Making Tools  
Diamond Reamer - Craft Chameleon

The first thing I did was make a template of my acrylic bookmark in Silhouette Studio Designer Edition so I could make sure I cut my vinyl out in the correct size.  The acrylic bookmark from Craft Chameleon is 1.5" x 4" so I drew a rectangle with these measurements. 

As you can see I actually drew the rectangle at 4.5” and then put a small line across it at 4” and
put the circle/hole in it.  This part is not necessary but I did it to help me envision the final product.

The next thing I did was decide on what pattern I wanted on my bookmark.  Since my bookmark is for a friend who lost her sister I decided to go with a cross design.  I searched the silhouette design store and found the perfect cross shape and purchased it.  Once I had it purchased I edited it to the size I wanted and duplicated it multiple times so that it formed the design I wanted and covered the entire bookmark.  My actual bookmark is clear but so you could see the design in the Studio I changed it to black for the picture. 


Now I decided on what quote I wanted to put on the bookmark.  I decided to use a bible scripture for comfort.  Using the text tool I typed out the quote and selected my font and sized it to fit the bookmark and charms.  I used the font “Maxwell Bold” for all the wording.  I used the templates from Craft Chameleon to get the sizing correct.  In order to prevent waste of vinyl I used the subtract feature under modify to cut the cross background pattern down to the size of the bookmark.


Once I finished all my designing, I cut and weeded the vinyl and lastly applied it to the acrylic pieces.


Make sure you peel the clear plastic coverings off the acrylic pieces first before applying the vinyl.  Then you take your transfer tape and pick up the weeded vinyl pieces and place them onto the acrylic pieces.  

After I have the vinyl applied to the pieces I poke the hole in the acrylic with the diamond reamer I purchased from Craft Chameleon.  I also rub it around the edge of the cross and bookmark acrylic pieces to trim off the excess vinyl from the backs.


Now that I have all the vinyl applied I sit them to the side to cure while I work on assembling the hardware findings and make the bead dangles.  

To start I usually go ahead and attach the triangle bail to the bookmark even though it doesn’t have to be attached right away.  Mainly I do this just so I have this part done and I don’t have to worry about a little helper getting a hold of the triangle bail and putting it in his mouth or just running off with it. 


Next I move onto the bead dangles, once again to prevent a certain little helper from getting ahold of little pieces and scattering them around the house.  Bead dangles are pretty easy to make.  To make a bead dangle you first take your headpin… the ones I use are just plain 2” headpins that I picked up from a big box store.  


You then just thread the beads (also gotten from a big box store in this case) onto the headpin. 


Once you thread your beads onto the headpin comes the tricky part.  You take your round nose pliers and bend the end of the headpin around to make a loop. Once the loop is formed you can trim the excess and manipulate the wire to your desired shape and size.  Then you use a jump ring and attach the bead dangle to the lobster clasp. 


Next I move onto attaching the charms, tassels, and small acrylic pieces.  I do this with a combination of jump rings and extension links depending on the size of each of the pieces and how I want them to hang.


After the vinyl is cured I typically seal the small pieces with either mod podge or clear nail polish.  Once your sealer is dry you can attach the beaded charmed piece using the lobster hook to the triangle bail on the bookmark piece. 


TA-DA you have a finished your fancy charm and beaded bookmark to enjoy the next time you read a long book!!!


Monday, August 1, 2016

This is just the tip of the iceberg...


Yes for the month of July we added a new shape every day.  There are so many that we have a heading in the menu. Don't miss out in August....more shapes and items to come!


Wednesday, July 27, 2016

Acrylic Faux Sea Glass

This is a post that I wrote for the "Terri Johnson Creates Blog".

Faux Acrylic Sea Glass
Summer is in full swing now and if you are not lucky enough to walk the beach to collect sea glass, this tutorial is for you. Hello all, Jamie from Craft Chameleon here! Terri has graciously opened up space on her blog to share this fun technique.

What you will need for this project other than your Silhouette and permanent vinyl is as follows:
Paper Plate, 2 grades of sandpaper, nail file, double sided tape, translucent acrylic.


First, you will want to secure the coarsest sand paper down on the paper plate using your double-sided tape. The plate does three things. It keeps your sandpaper located; keeps your dust/sandpaper granules collected and keeps your sandpaper flat/level as to not create gouges.


Next, take the translucent acrylic and sand in a circular motion on the sand paper. Place your fingers on different areas of the acrylic to assure even sanding.

Do this for both sides. When the acrylic is evenly sanded, with the coarsest sandpaper, empty your plate, and replace with the least coarse. Repeat the sanding process.

When completed the acrylic will have a frosted appearance. However, the edges will still have a gloss finish. 

Quickly and easily, take the gloss off the edge with a nail file for your finishing step.


Wash with clear water and dry. Add your vinyl design and complete your project!

Monday, July 25, 2016

Tooth Fairy Bag


You don't want to miss out on these!!
Click here for these fantastic bags.


Friday, July 22, 2016

HTV on Acrylic Blanks


Hello all this is a blog post I wrote for the Silhouette School Blog. It has some good information so I wanted to share it with you all too!

Hope your summer has been full of celebrations. Jamie Omahen from CraftChameleon, here to show you how to make a quick, easy, smooth writing surface, and bubble free Guest Board perfect for any type of gathering!

Gorgeous wood signs for guest books are all the rage for weddings, baby showers, bridal showers, birthday party, bat mitzvah, bar mitzvah, anniversary, memorial service, house warming, grand openings, and family reunions.

 I love the concept and look of those boards but would rather have a smooth finish for the guests to write on, plus a permanent marker can be used and the nib will last much longer.

Enough chatter, let’s make one!

Supplies: 

*HTV with your design mirrored, cut, & weeded
*Wood sign or board

*Acrylic with 4 holes drilled – available from Craft Chameleon
  Note: Clear acrylic will not remain clear in a heat press however solid color or glitter acrylic works well.
*Heat press – heat 300 degrees, timer 5 seconds (settings may vary)
*Parchment Paper
*Scissors
*Hammer
*Decorative tacks or nails - availablefrom Craft Chameleon
*Old Towel
* Permanent Ink marker
*Item similar to a flat cookie tray or other flat metal tray
*Large heavy books to weight down the metal tray
* Optional – Power drill or Dremel type tool


You want to start by creating or opening a design and scale to size. Don't forget to mirror the
design since you will be cutting on Heat Transfer Vinyl.


Load your Heat Transfer Vinyl (glitter or smooth will work) on to your Silhouette cutting mat and cut the design. Weed it.


Cut the carrier sheet following around the heat transfer vinyl design. The carrier films leaves a slight impression, cutting the general shape of the design helps it disappear in the second press.


Place the htv design on the acrylic. Cover top and bottom of the acrylic with parchment paper. Teflon sheets are not recommended, as they impress a pattern on the hot acrylic.


The second press will finish bonding the vinyl to the acrylic and any lines made by the carrier sheet.

Press for 5 seconds at 300 degrees. Open press, carefully remove carrier sheet, recover with the parchment paper, and press again for another 5 seconds.


Wait! What is this photo of? Well I didn’t have a cookie sheet or heavy books so this was my work around.

After the second pressing, you will need to let your acrylic cool under something flat and heavy thus the flat metal sheet & books in the supplies list. Be sure to leave the parchment paper on both sides of your acrylic. 
Shown above, a flat metal plate with a heavy box under which is warm acrylic! The larger the longer it takes to cool


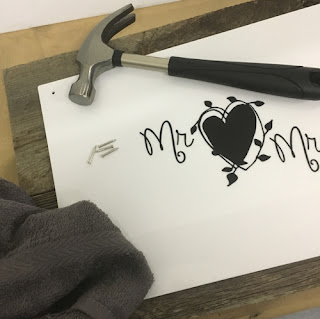
The final step is to attach the acrylic to the board using decorative tacks or nails. Depending on the type of wood used in your sign, pre-drilling pilot holes is a good idea. For the last few taps on the nail head use a folded towel over the area to avoid marring.


Pair the acrylic board with the permanent marker of your choice and the Guest Book Board is ready to go. I had so much fun making the first one, I made a second. In fact I love these so much I am sharing the files, so enjoy!