Hello all this is a blog post I wrote for the Silhouette School Blog. It has some good information so I wanted to share it with you all too!
Hope your summer has been full of celebrations. Jamie Omahen
from CraftChameleon, here to show you how to make a quick, easy, smooth writing
surface, and bubble free Guest Board perfect for any type of gathering!
Gorgeous wood signs for guest books are all the rage for weddings, baby showers, bridal showers, birthday party, bat mitzvah, bar mitzvah, anniversary, memorial service, house warming, grand openings, and family reunions.
I love the concept and look of those boards but would rather have a smooth finish for the guests to write on, plus a permanent marker can be used and the nib will last much longer.
Enough chatter, let’s make one!
Supplies:
*HTV
with your design mirrored, cut, & weeded
*Wood sign or board
*Acrylic with 4 holes drilled – available from Craft Chameleon
Note:
Clear acrylic will not remain clear in a heat press however solid color or
glitter acrylic works well.
*Heat press – heat 300 degrees, timer 5 seconds (settings may vary)
*Parchment Paper
*Scissors
*Hammer
*Decorative tacks or nails - availablefrom Craft Chameleon
*Old Towel
* Permanent Ink marker
*Item similar to a flat cookie tray or other flat metal tray
*Large heavy books to weight down the metal tray
* Optional – Power drill or Dremel type tool
You want to start by creating or opening a design and scale to size. Don't forget to mirror the
design since you will be cutting on Heat Transfer Vinyl.
Load your Heat Transfer Vinyl (glitter or smooth will work) on to your Silhouette cutting mat and cut the design. Weed it.
Cut
the carrier sheet following around the heat transfer vinyl design. The carrier films
leaves a slight impression, cutting the general shape of the design helps it
disappear in the second press.design since you will be cutting on Heat Transfer Vinyl.
Load your Heat Transfer Vinyl (glitter or smooth will work) on to your Silhouette cutting mat and cut the design. Weed it.
Place the htv design on the acrylic. Cover top and bottom of
the acrylic with parchment paper. Teflon sheets are not recommended, as they
impress a pattern on the hot acrylic.
The second press will finish bonding the vinyl to the acrylic and any lines made by the carrier sheet.
Press for 5 seconds at 300 degrees. Open press, carefully
remove carrier sheet, recover with the parchment paper, and press again for
another 5 seconds.
Wait!
What is this photo of? Well I didn’t have a cookie sheet or heavy books so this
was my work around.
After the second pressing, you will need to let your acrylic cool under something flat and heavy thus the flat metal sheet & books in the supplies list. Be sure to leave the parchment paper on both sides of your acrylic.
Shown above, a flat metal plate with a heavy box under which is warm acrylic! The larger the longer it takes to cool
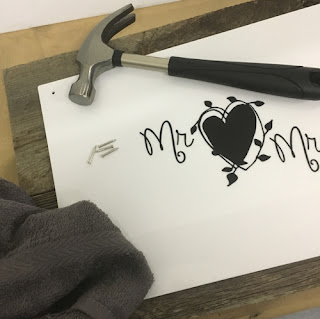
The final step is to attach the acrylic to the board using decorative tacks or nails. Depending on the type of wood used in your sign, pre-drilling pilot holes is a good idea. For the last few taps on the nail head use a folded towel over the area to avoid marring.
Pair
the acrylic board with the permanent marker of your choice and the Guest Book
Board is ready to go. I had so much fun making the first one, I made a second. In
fact I love these so much I am sharing
the files, so enjoy!


No comments:
Post a Comment
Thank you for stopping by and spending time with us!
Be sure to share your thoughts or ideas on products you would like to see. Or share your creations made with Craft Chameleon products.