 |
| Scrapbuster Project |

Showing posts with label heat transfer vinyl. Show all posts
Showing posts with label heat transfer vinyl. Show all posts
Wednesday, June 3, 2020

Saturday, May 30, 2020

Saturday, May 16, 2020

Wednesday, September 19, 2018
Fall Ruffled Burlap Garden Flag Tutorial - from blank to beautiful - step by step tutorial - heat transfer vinyl and MORE!
 |

With Labor Day behind us Fall has [un] officially begun! Time to switch over the décor to all things leaves and pumpkins. This post will guide you through how to make a burlap garden flag. I am partial to the ruffle bottom garden flag but the same can be done on any of the garden flags sold at Craft Chameleon.

Materials Needed:
* items have links to the Craft Chameleon items
* 12” x 16” [Ruffle Bottom] Garden Flag
* Siser glitter heat transfer vinyl
* Foil and Siser Heat Transfer Adhesive
* items have links to the Craft Chameleon items
* 12” x 16” [Ruffle Bottom] Garden Flag
* Siser glitter heat transfer vinyl
* Foil and Siser Heat Transfer Adhesive


Since you’re using heat transfer vinyl you will need to flip your design horizontally.


Editors input: Hot off the presses Craft Chameleon has foil and Siser adhesive!
Once all of your pieces are cut it is time to puzzle piece the design back together onto the garden flag.

Now add your wreath or laurel and leaves. The key to applying multiple colors in one press is to make sure that the transfer layer on top of the vinyl is not under any other pieces of heat transfer vinyl. I trim my pieces really close to help with this. If that’s not doable for you then lay out how you want the design to be on the flag and press so that you don’t have any issues.
Looking at my picture above you may see some overlap but trust me none of it is under any other pieces of heat transfer. They can overlap on top but never have that top layer under.
Looking at my picture above you may see some overlap but trust me none of it is under any other pieces of heat transfer. They can overlap on top but never have that top layer under.


Now that your design is pressed onto your flag, it’s time to add it to your garden. Happy Fall Y’all!
Thank you, Liz and your cute little helpers!
For our readers, remember sharing is caring so we have 2 images we would really appreciate you sharing on your social media and on Pinterest.


Wednesday, August 1, 2018
Back to School Teachers Tote & Tag using Cricut Tutorial 2018

Welcome to this weeks guest blogger Amanda Eaker!
Hello everyone, I chose to do a back to school tote because my stepmom is a Kindergarten teacher that LOVES Pete the Cat. Everything in her room is decorated with Pete the Cat.

Supplies
Items listed with an * are clickable links to the products
Items listed with an * are clickable links to the products
* Black Canvas Tote
* Siser Glitter HTV (Heat Transfer Vinyl)
* Triangle Bails
* Oval side cut jump rings
* Swivel Lobster Clasp
* Blue Saphire Birthday Charm
* Red Apple Acrylic Charm
* 1" Clear Acrylic Circle
* 2 bent nose pliers (I used needle nose ones I already owned)
Electronic Cutting Equipment
Transfer tape
Cutting Mat and weeding tools
Heat Press or Iron
SVG or other digital design
Heat Press or Iron
SVG or other digital design


Here, the cut file has been arranged to gain the best utilization of the glitter htv. Now we are ready to cut...almost!

Be sure to set up your material size and turn on Mirror Cut. Mirror Cut needs to be selected since Siser glitter HTV has to be cut in reverse (shiny side down). Make sure to set your Cricut Machine to cut mirror also.

Weed the HTV and place on your tote. To use an iron consider placing a large tile on the floor, cover your project with parchment paper and press applying as much pressure as possible. You will not move the iron back and forth. You will select an area and apply pressure per the manufacturer's instructions on time. Repeat over the entire area. Make sure to follow the time and temperature dictated by the HTV manufacturer.
If your bond is not complete, try leaning on the iron throwing some body weight aka pressure down your arm/hand. Repreat the pressing process again. Applying HTV requires heat AND pressure, not heat alone.
If your bond is not complete, try leaning on the iron throwing some body weight aka pressure down your arm/hand. Repreat the pressing process again. Applying HTV requires heat AND pressure, not heat alone.

Now for the bag tag, I added the glitter Initial to the 1" clear acrylic disc (be careful too much heat will cause the acrylic to fog.) Then I assembled the clear disc, the red apple charm, and the birthday charm.
Here is a great tutorial on this blog showing assembly methods: https://craftchameleon.blogspot.com/2018/05/how-to-make-acrylic-keychains-easy.html
Here is a great tutorial on this blog showing assembly methods: https://craftchameleon.blogspot.com/2018/05/how-to-make-acrylic-keychains-easy.html

Now is my stepmom going to be thrilled for Kindergarten to start this year!
Thanks, Amanda for this Cricut post! Makes me want to plug mine in and take it for a spin! If it has inspired you, please comment below!
Please consider sharing this post. The vertical image above is great for Pinterest and the horizontal image below is fantastic for FB, IG Twitter and others.

Thanks, Amanda for this Cricut post! Makes me want to plug mine in and take it for a spin! If it has inspired you, please comment below!
Please consider sharing this post. The vertical image above is great for Pinterest and the horizontal image below is fantastic for FB, IG Twitter and others.

Wednesday, July 11, 2018
How to use htv on Neoprene Popsicle Holders and Sea Shell Bag Blanks

Alyssa Cardin is back with two fun and easy summer projects, Popsicle Holders and Seashell Bags. Take it away Alyssa!
Before we begin with the popsicle holders I wanted to take a minute to show you the difference of the popsicle holders you get with Craft Chameleon vs. the ones you might find elsewhere. The ones from Craft Chameleon are much better quality and will fit a wider and longer pop.

The blanks you will need from Craft Chameleon are the Popsicle Holders which come in an array of colors and styles and the Seashell Bags. These bags come in pink, aqua blue, navy and lime green.

Okay - let's Begin. I made two designs for the Popsicle holders. One to resemble a crayon and one to resemble a reptile like animal, so when you put the popsicle in place it looks like a tongue. Craft Chameleon also sends designs that can be downloaded and used with the popsicle holders.

Decide on the design you want to use and either bring it into your design program or design it there from Scratch. Size your design to fit the popsicle holder, remember there is an edge so you want the design to fit in the flat section.

Reverse your design and cut using HTV.

If your design has multiple colors you will need to cut each color separately and then layer when pressing.

Weed your vinyl. Place the vinyl on the popsicle holder, if multiple colors you will press one color at a time with the bottom layer being first.
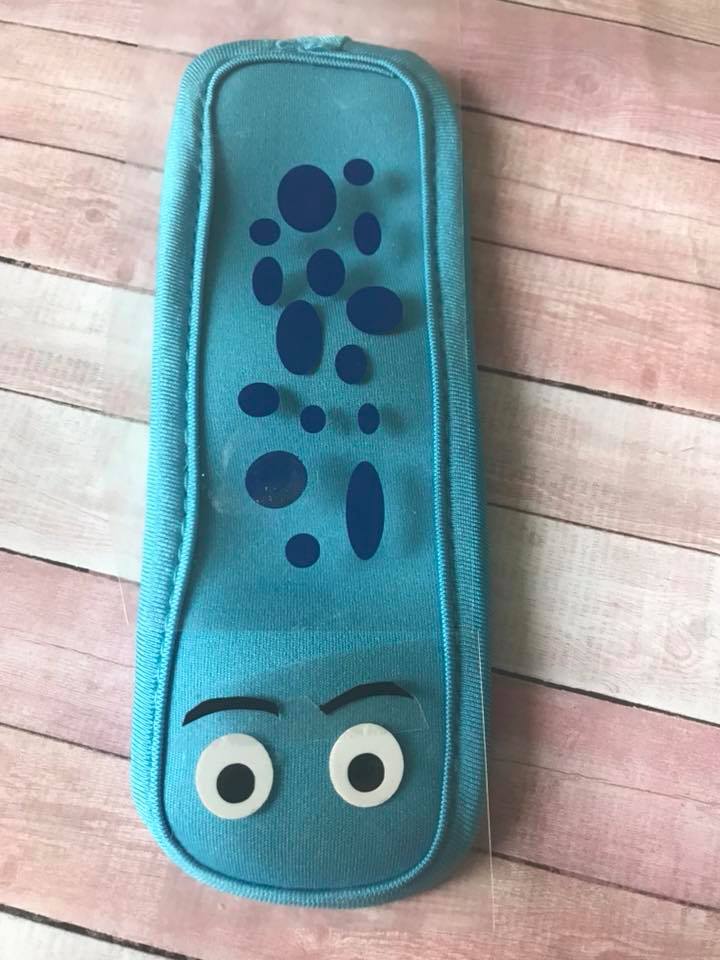
Make sure to fold the vinyl under the edge before pressing if the vinyl overlaps. Press according to the vinyl's instructions.

Now you have yourself a fun popsicle holder, and maybe a slightly less messy kid!

The seashell Bag is just as easy, and everyone loves these - kids and adults!

The most difficult part of the seashell bag is paying attention to the size and pressing without the sides of the handles in the way.
Decide on the design for this project. I recommend not making it longer than 10 inches in length and 2.5 inches in width.

Size the design and mirror horizontally since we will be using HTV.

Cut the design and weed HTV.

Pressing the vinyl is the tricky part if the vinyl is close to the edge. A few tips - a mini iron, hair straightner, or a hand iron might give better control for pressing this item. If using a heatpress, angle the bag on the press so the strap next to the design is off the press or place a teflon sheet, or a tshirt folded inside the bag to raise the area that will be pressed. This will allow the pressure to be applied to the design without being blocked by the handle.


Press for the recommended amount of time and temperature. Remove HTV masking. In no time at all you have created a wonderful seashell bag. This bag is also useful for collecting rocks, putting small sand toys in, and for carrying sandy shoes.

Have a Happy Summer!
PS Please remember to pin or share our blog post!


Tuesday, March 6, 2018
Burlap Bunny Bags - Heat Press & Iron Tutorial using Heat Transfer Vinyl
 |
| Photographs CG Swafford |
Hi everyone! I’m CG, a crafter/hobbyist/home business owner in southwest Ohio. I have been married to my wonderful husband for 10 years and I am a stay at home mother of 2 great children, an 8 year old daughter, and a 4 year old son. I find time to craft and create between school-time and daily life and I enjoy every second. I received both of my Silhouette Cameo original and a Silhouette Cameo 3 as gifts. I currently use Silhouette Design Software for Business.
I have been using my Silhouette Cameo for home crafts, birthday décor and gifts since 2012. I am honored to be apart of the Craft Chameleon Blog and I am so excited to share these super cute burlap bunny bags with you today. I will be demonstrating 2 ways to apply heat transfer vinyl to the burlap bags, with a heat press, and with a home iron.
I have been using my Silhouette Cameo for home crafts, birthday décor and gifts since 2012. I am honored to be apart of the Craft Chameleon Blog and I am so excited to share these super cute burlap bunny bags with you today. I will be demonstrating 2 ways to apply heat transfer vinyl to the burlap bags, with a heat press, and with a home iron.
Supplies:
Items with * have a link to the Craft Chameleon products
* Bunny Face File - these are free with your purchase.
The file links are found in your shipping confirmation.
Siser Easyweed Heat Transfer Vinyl in Black & Royal Blue
Vinyl Cutting Machine
Silhouette Designer Software
Teflon Cover Sheet
Heat Press or Home Iron
Step 1
Download files from Craft Chameleon for this project. We will be using a modified version of CC Bunny Face. Open the downloaded file in your design software.

Step 2
Select the image, right click and then select Ungroup. We will be removing the ears from the image and using the face portion only. Now select the ears and delete. This will leave the face on your screen.

Step 3
Select all the parts of the face & Group. Resize the image to approximately 6” wide x 4” tall.

Step 4
Using the text tool add a name to your bunny face using your favorite font. I have chosen to use Smoothie Shoppe for Olivia & Whackadoo for Owen. These are both free fonts found at Dafont.com. Size the name and center to your liking. Be sure to weld the font if the letters overlap.

Step 5
I added a bow as an embellishment to the top of my design. I sized it to about 2x2.5. I have had this image for so long I can’t remember where I got it. However, Craft Chameleon has this bow design for $.90 and you get an acrylic bow to use later!
Step 6
Mirror your image and text.

Step 7
Cut your pieces from heat transfer vinyl in your desired colors. Use the recommended cut settings for your machine and vinyl type. I cut the Siser Glitter first and Siser Easyweed next. Since these cut with different cut settings, I had to send them thru the Silhouette at separate times.

Step 8 Heat Press
{If you are using a home iron, skip this these steps and refer to the Step 8 Home section below.}
{If you are using a home iron, skip this these steps and refer to the Step 8 Home section below.}
Weed the vinyl & prepare your heat press to the correct temperatures for your brand of vinyl

Step 9
Press the Bunny Bag for a few seconds using a Teflon or cover sheet to get out some of the moisture. Tip: Some crafters use a folded towel inside to keep the lining straight and unbonded. Plus it can aid in getting an even press.

Step 10
Align black vinyl in the appropriate location on the bag being sure things are level and even. Press for the recommended time.

Step 11
Remove carrier sheet and press again for a few more seconds. If the vinyl lifts with the carrier sheet, lay the carrier sheet back down and press again with the heat press. Be sure to apply with lots of pressure.

Step 12
Repeat with pink vinyl pieces. Once the vinyl has all been applied and carrier sheet removed, cover one last time with Teflon cover sheet and press again for a few more seconds. This process will set the design.

Step 8 Home Iron
Adjust the heat dial on your Home Iron to Wool or slightly below. I have found that this temperature setting works best with the burlap material.

Step 9 Home IronOn a firm work surface, place a Teflon cover sheet over your bunny bag. Press the design area for a few seconds to remove excess moisture. Tip: Some crafters use a folded towel inside to keep the lining straight and unbonded. Plus it can aid in getting an even press.

Step 10 Home Iron
Next, align the black bunny eyes & whisker piece to the desired location. Be sure it is level and centered where you want. Cover with Teflon sheet and press down firmly for 10 to 15 seconds with your home iron. Do not move it back and forth. If your iron does not cover the entire design press in segments until the entire piece has been pressed.

Step 11 Home Iron
Remove the Teflon cover sheet and lift carrier sheet from the vinyl. If the vinyl lifts with the carrier sheet, place the carrier sheet back down and recover with Teflon sheet and press again with the home iron. Pressure is key!

Home Iron TIP: If the vinyl is having trouble adhering to the burlap, I have found that burnishing it a bit really helps. I do this with my iron or my vinyl squeegee after the vinyl is heated a bit through the Teflon cover sheet. I have found that this helps to get the vinyl down in the grooves of the burlap and create a secure bond.

Step 12 Home Iron
Once the vinyl is applied and carrier sheet has been removed, cover the design area with the Teflon sheet again and press a few more seconds with the home iron. This will set the design.
Once the vinyl is applied and carrier sheet has been removed, cover the design area with the Teflon sheet again and press a few more seconds with the home iron. This will set the design.

To Complete
Repeat steps 10 -12 with the nose, bow, and name.
Repeat steps 10 -12 with the nose, bow, and name.
Voila! Your Burlap Bunny is in/on the Bag!

Thank you CG Swafford!

Subscribe to:
Posts (Atom)