Showing posts with label glitter acrylic blanks. Show all posts

Friday, April 27, 2018

Glittering Teachers Gifts DIY Tutorial - Gifts that teachers will actually want!

 DIY Glitter Acrylic Pencils for Teachers Gifts Tutorial


This Friday we welcome Melissa Biebel to the Craft Chameleon Blog. She has produced a really unique, clever and glittery tutorial today. Let us know if you try this technique!

Follow along while I show you the method to glitter your clear acrylic pencil blanks to add sparkle to your favorite teacher's life! Shown here is cute classroom sign and coordinating keychain but other acrylic shapes from CraftChameleon.com can be used with this technique.


Supplies
Items listed with an * are clickable links to the products on the website.
* Acrylic Blank Pencil 3"
* Keychain 
* Triangle Bail

* Tassels
* Oval Jump Rings
  Painters Tape
  Small Paint Brush and/or Popsicle Stick

  Glitter  
  Mod Podge
  2 Part Epoxy * Acrylic Blank Pencil Sign
  Ribbon or Twine to Hang the Sign


First to get the glitter in the proper areas of the acrylic, use the tape to create the areas for glitter.


While you use a paintbrush or popsicle stick to apply your mod podge, I use a squirt bottle to get it onto the acrylic. I think it improves accuracy, keeps stray glitter out of the jar and is less wasteful. If you decide to make a several you might consider employing this technique.


Use your small paintbrush to smooth the mod podge onto the area you want to glitter. Be sure your layers are thin.


Sprinkle your glitter onto the mod podge. Shake off the excess and let it dry. If you need or want a second layer of glitter, repeat with another layer of mod podge then glitter. Continue layers until you are happy with the result.


Peel off the tape while the mod podge is still wet. 


Move the tape down the acrylic pencil blank and continue the mod podge glitter process.


To make the zig-zag area just tear the tape and place it on the blank Another option is to cut a piece of vinyl from the cut file provided by CraftChameleon.com. 


Almost completed, tape off the lead portion of the acrylic. Then proceed with the mod podge and glitter process.


Now all the glitter layer are complete, just allow drying.


To completely seal the glittered acrylics, I prefer to use a two-part epoxy resin. It provides a harder protection over the glitter. I use Alumilite Clear Cast. It can be found at most craft stores.  Make sure to get the clear drying formula, there is another one that dries white.

Mix the 2 parts together in equal portions with a popsicle stick that you can use to apply the resin (shown in the photo above). Do not apply resin in the hole or it will be filled.

If you do not want to use a 2 part epoxy try the dimensional mod podge or other thick clear coat. 


Once completed with the epoxy application, let the pencils sit for a few hours until cured.


Once dry, apply the decal with your teacher's name. Another coat of epoxy can be added to protect any small pieces of vinyl. Assemble your keychain and you're done!


To make the large pencil sign follow the same steps. It is just on a larger scale.


To hang the sign, thread a ribbon or twine through the holes on the top and tie to secure. The triangle bails can be used in the holes with chain for another hanging alternative.

Thank you, Melissa, for a cute and unique tutorial!

Won't you consider pinning our image below? We'd appreciate it!

Pencil Acrylic Blank Glitter Tutorial for Teacher's Gift

Wednesday, April 4, 2018

Mother Will Love These DIY Earrings on Her Special Day

Hello! Jamie here today. Hope you are ready to learn how to make these fabulous acrylic earrings.  Our designer, Jewellee, was here in Saint Louis last week and she designed these. Just in time for you to order and make up for the mothers in 
your life! So here we go....ENJOY!


Supplies:
Items with * have a link to the Craft Chameleon products


* Double J Earwires

* 2 Bent Nose Pliers or needle nose pliers

  E6000 or the adhesive of your choice


DIY Daisy & Post Earrings

Remove all the protective plastic from both sides of your acrylic pieces. Remove only the front plastic on the flower centers. Like the daisy above, if your piece has some white on it, you can remove it with your fingernail.


Now peel off the release paper backing to reveal the adhesive on the round flower center.


Locate the center and press the round acrylic firmly in place. Allow 24 hours plus to fully cure. 


Now we are ready to assemble! 


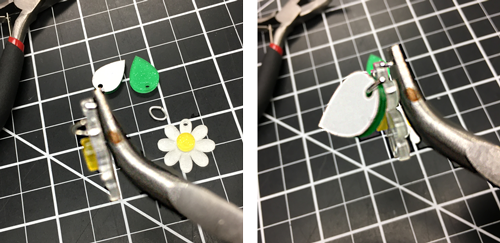
Take your oval jump ring and twist to open using the 2 bent nose pliers. Slide the glitter 1 side acrylic Daisy and Leaf onto the oval jump. Make sure they are facing each other. Then close the jump ring reversing the twist action.


Flip the leaf portion up and lay the entire piece down. Next, let's attach the post!


Using the Craft Chameleon 5mm pad post earring, glue at the top of the leaf. We suggest E6000 but you can use the adhesive of your choice. it is best to rough up both the acrylic and the metal pad with an emery board to provide a bit of tooth for any adhesive.


Let adhesive cure for designated time for best results. Wow, so cute, so fast and such a great gift! Ready for something even faster and easier BUT just as cute? Here we go!


DIY Daisy Dangle Earrings

This time we will only need the daisies and the centers and 1 pair of our Double J ear-wires. Take off the clear protective film from all surfaces. 


Remove the release paper from the back side of the centers, locate on top of the daisy and press firmly in place. 


Slide the daisy onto the Double J ear-wire. Then bend the ball portion of the wire back to lock the flower in place. Oh no, you didn't just make a set of fabulous daisy earrings in less than a few minutes! Oh yes, I did!


Tuesday, January 16, 2018

Super Bowl Super Simple Super Cute

Acrylic Foot Ball Helmet blanks for vinyl and Football acrylic blanks for vinyl
Photo credits : Faye Mitchell


Hi Everyone, It’s me, Faye Mitchell and I’m back with another guest blog posting.  This time I’m making a Super Bowl themed Acrylic Tic Tac Toe Game Board Set using the amazing products you can purchase from the Craft Chameleon.


Items needed:
Transfer Tape 
* SVG Design Program
Vinyl Application Tool
Fabric Paint or Fabric Markers
Paint Brushes

Items listed with an * are clickable links.


The first thing I did was make a template of my game board in Silhouette Studio Designer Edition so I make sure the colors I chose looked good together and so I could add the wording to the board around the tic tac toe board.

I did this by drawing a 3.5” x 3.5” square.  I then added the tic tac toe board digital file, provided  by Craft Chameleon in your order's shipping notification, onto my square.
Tic tac toe vinyl design for acrylic blank game boards with Super Bowl theme

Once I got my tic tac toe board onto my square, I resized it slightly since I wanted to add some words around the outside edge.  I did this by just clicking on the board and using the resizing squares to drag it in a little bit smaller.  


Once I had it the size I wanted it I used the text feature in my design studio and added the words to the board.
  I used the font Junior Varsity from the Silhouette Design Studio Store.  Not seen in the photo but I also put LII in the center box since it is the 52nd super bowl this year.


With my board designed, I started working on the designs for the game pieces. these are ordered as charm size with no holes on the Craft Chameleon website.

Since it is still early, so I don’t know which teams are going to make it to the super bowl, coupled with copyrighted team logos, I decided to keep it simple. My super bowl super solution?  I went with the AFC vs. the NFC for my game.  I decided my AFC team would be represented by the Football Helmet charm and the NFC would be represented by the football charm.

* Smooth brown glitter finish is on one side only.

With all my designs all created, I started to cut the vinyl. You may notice that my vinyl pieces were super tiny but they cut like a dream using the CB09 blade kit (60 degree blade) from Craft Chameleon. 

I did all my cutting at once and worked on weeding each color while the next color was cutting.  It saves time and  works best for me. 

To save vinyl I put my white football laces in the middle of my tic tac toe board and went ahead and put them onto the football charms using my weeding tool instead of transfer tape prior to taking this photo.

After all the pieces were cut and weeded I started the assembly process.  This is when it starts getting really fun because you can finally see the design come to life.  I personally started with the game board and put the words on first followed by the tic tac toe cross hatch with the last step adding the LII. You could also personalize with a name or monogram too!


Once I had my game board completed I needed to get my pieces done.  I decided since I had already done part of the football charms I would go ahead and get them finished first. 

Before applying any vinyl,  take the protective plastic off the acrylic charm blanks or you’ll be spending extra time re-cutting your vinyl  Then to place the vinyl, use
 a small piece of transfer tape to pick up the NFC wording and place it carefully onto the footballs.


Onto the “AFC” Football Helmet Charms!  Assembled using the same methods as the footballs by using a small piece of transfer tape to apply the AFC wording . Repeating the process to put the red face mask pieces onto the charm.

TaDa! My board is complete and I’m ready to play some super fun, Super Bowl Tic Tac Toe.


Come back on Saturday and I will show you how I made this darling bag to keep the set in!