Thursday, July 26, 2018

Unicorn Birthday Party Favors Bag, 18" Doll Shirt, Unicorn Bag Tag and FREE cut file! (2018)

Our guest blogger this week is Darci Slager and she has a fabulous project for the perfect unicorn lover birthday party! Plus all the files are free. So let's get started!

SuppliesItems listed with an * are clickable links to the products
Cutting Mat and weeding tools

Heat Press or Iron - Cricut EasyPress Used


SVG or other digital design


Part 1 – Acrylic Unicorn Bag Tag


Open the unicorn SVG (provided by CC when the acrylic blank is shipped) in your electronic cutting machine’s design program and place it where you want it to cut. 


Place the Oil Slick vinyl on your mat (paper side down, shiny side up) load your machine and cut the vinyl on the default metallic vinyl settings.  It’s a good idea to do a test cut first though. 


When your machine is finished cutting, remove the whole sheet of vinyl from the mat and cut a square around your design so you can save the remaining sheet of vinyl for another use.  Then weed the unicorn design by removing the excess vinyl that is not part of the design.  


Place a piece of transfer tape (slightly larger than your design) over your vinyl unicorn and burnish.  Peel back the white paper backing leaving the vinyl unicorn on the transfer tape. 


Remove the brown protective cover from the acrylic blank.  Line up your cut vinyl very carefully over the acrylic blank and then place the transfer tape with vinyl onto the acrylic. 


Burnish well and slowly pull off the transfer tape leaving the vinyl on the acrylic.


You will need to punch a hole in the vinyl with either a diamond tip reamer or an Exacto knife.  


Loop the ball chain through the hole in the acrylic and fasten it.  I did not, but you could personalize a bag tag for each child attending the party if you like by adding a vinyl name or monogram after adding the unicorn design.  Your bag tag is done! 


Part 2 – HTV Doll Shirt
Now we’ll work on the doll shirt party favor.  You’ll use the same unicorn design provided by CC again and you don’t even have to resize it!  It’s already the perfect size for the doll shirts. 


First, open the unicorn design but this time you will mirror (flip horizontally) the image in your program.  


Place the purple HTV on your mat shiny side down, load your machine and cut on the default glitter HTV settings.  Feel free to do a test cut first to be safe though.  When you are finished cutting, remove the sheet of HTV from the mat and cut a square around your cut design so you can save your extra HTV for later. 


Weed your design by removing the excess HTV from the clear carrier sheet that is not part of the unicorn design.  


Place the HTV unicorn shiny side up on the front and center of the doll shirt.  


Press with an iron or heat press for 15 seconds at 320 degrees Fahrenheit. 


Remove the carrier sheet right after pressing.  Your doll shirt favor is done!


Part 3 – HTV Favor Bag

Lastly, we will create a favor bag to tie everything together and to package the doll shirt and bag tag beautifully.  First, find a design you love and open in your design program.  I used Silhouette Design Store Design #211952.


 Free SVG file
Craft Chameleon is offering this design for free! Click here or on the image to download.


I personalized the bag on the back, so I created a text box and added the name in a font I liked.  Then I mirrored the name and the purchased unicorn design.


I used both purple and cherry HTV, so I separated the design by color and cut the purple and then the cherry using the method outlined in the doll shirt section.  


After both colors are cut and weeded, you will press them one at a time onto the canvas bag.  I pressed the purple design on the front for just a few seconds at 320 degrees Fahrenheit, removed the clear carrier sheet, and then lined up and pressed the cherry portion for 15 seconds at the same temperature.


Lastly, I flipped the bag over and pressed the name on the back of the bag for 15 seconds at 320 degrees, and then removed the carrier sheet.


Now that the bag is complete, it’s time to pull everything together.  Start by folding up the doll shirt showcasing the unicorn design on it and tuck it inside of the canvas bag. 


Add the unicorn bag tag to the bag by fastening the ball chain around the bag’s loop closures and pull tight to close the bag.  That’s it, and now you have a beautiful unicorn party favor that can be used for years to come!

This party favor can be altered for almost any theme by selecting any one of the many CC acrylic blanks as the base (princess, mermaid, pirate, sports, animals, luau, holidays, etc).

Thank you, Darci, for another outstanding blog post! Comment below with the theme you would use for your party favors!

Remember sharing is caring so if you enjoyed this post please consider pinning or sharing on your favorite social media!


Wednesday, July 18, 2018

Personalized Color Your Own Bag DIY Tutorial 2018


It's so nice to welcome back Terisa Bostic, this weeks guest blogger! Terisa is showing how to make this personized 'Color Your Own Tote Bag!' So let's dig in with Terisa below!

SuppliesItems listed with an * are clickable links to the products

Sturdy Canvas Tote Bag with Handles (Natural color)


* Black Heat Transfer Vinyl


Cutting Equipment  - Used here Silhouette Cameo


Cutting Mat and weeding tools

Heat Press or Iron - Cricut EasyPress Used


SVG or other digital design


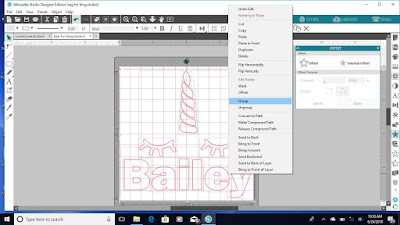
Use the font selection tool, type in the name you will be putting on the bag.  It is best to select a font that is thick and without out any swirls or flourishes.  For this design, I selected Franklin Gothic Heavy.


Next you want to create an offset that will allow you to cut the outline of the letters. This gives the “coloring book” effect to your finished item.   After typing the name, select the font and right click.  A menu option will pop up.  Select Offset.


The offset menu comes up.  Select Internal Offset and in the distance field type in 0.035.  Then click Apply.  You can play around with this number and create a thicker or thinner line, depending on what look you desire.  Depending on the font selected, you may have to adjust due to the shape of the letters.  If the offset is too large, your letters won’t cut properly.


Select your design that you wish to use to complement the name.  I selected a design I already had in my library from Silhouette Studio.


Highlight the design and then right click to bring up the menu.  Select Offset. 


Then click Internal Offset and change the distance to 0.025.  Click Apply.


Right click and drag the cursor to include both the design and the text.  Then right click and select group.  This brings your two designs together as one group.


Since we are cutting on Heat Transfer Vinyl, we need to reverse the design.  Highlight the design and right click.  Then select flip horizontally. 


Your design will be reversed on the screen.


Place HTV vinyl on cutting mat with the clear/shiny side sticking to the mat. Place in cutting machine. Click Send in the upper right corner.  Under material, it should say heat transfer material. ( Mine shown in the picture is incorrect.) Click Send.

Remove vinyl from machine when cutting is complete.  Weed design by removing the larger center part of the design.  The part you will need is the thin outline on the outside of the design.


The canvas bag will likely be a bit wrinkled when you remove it from the package.  Give it a quick press to remove the wrinkles before placing the vinyl.


 Center your cut out vinyl on the bag, with the sticky side down.


Place sheet of pressing material on top of the design.  I use just regular kitchen parchment paper.


Set your heat press to 305°C for 30 seconds.  Apply force to the heat press and apply to each area of the design.


When design is cooled, slowly remove the clear plastic from the design.


The design is finished and ready to color!  For a permanent effect, you can use fabric markers or sharpies.  For a temporary washable look, Crayola washable markers are perfect.


Thank you Terisa! What a great idea for your child or grandchild this summer, personalized party favors, activities bag, Sunday School tote, Mandala for adult coloring and so many other ideas.

Please consider pinning or sharing this article on your favorite social media!

Wednesday, July 11, 2018

How to use htv on Neoprene Popsicle Holders and Sea Shell Bag Blanks


Alyssa Cardin is back with two fun and easy summer projects, Popsicle Holders and Seashell Bags. Take it away Alyssa!

Before we begin with the popsicle holders I wanted to take a minute to show you the difference of the popsicle holders you get with Craft Chameleon vs. the ones you might find elsewhere. The ones from Craft Chameleon are much better quality and will fit a wider and longer pop.


The blanks you will need from Craft Chameleon are the Popsicle Holders which come in an array of colors and styles and the Seashell Bags. These bags come in pink, aqua blue, navy and lime green.

Okay - let's Begin. I made two designs for the Popsicle holders. One to resemble a crayon and one to resemble a reptile like animal, so when you put the popsicle in place it looks like a tongue. Craft Chameleon also sends designs that can be downloaded and used with the popsicle holders.


Decide on the design you want to use and either bring it into your design program or design it there from Scratch. Size your design to fit the popsicle holder, remember there is an edge so you want the design to fit in the flat section.


Reverse your design and cut using HTV. 


If your design has multiple colors you will need to cut each color separately and then layer when pressing.


Weed your vinyl. Place the vinyl on the popsicle holder, if multiple colors you will press one color at a time with the bottom layer being first.

Make sure to fold the vinyl under the edge before pressing if the vinyl overlaps. Press according to the vinyl's instructions.

 Now you have yourself a fun popsicle holder, and maybe a slightly less messy kid!


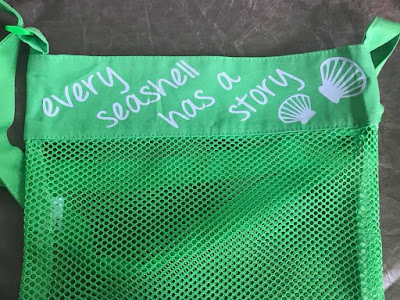
The seashell Bag is just as easy, and everyone loves these - kids and adults! 

The most difficult part of the seashell bag is paying attention to the size and pressing without the sides of the handles in the way.

Decide on the design for this project.  I recommend not making it longer than 10 inches in length and 2.5 inches in width. 

Size the design and mirror horizontally since we will be using HTV. 

Cut the design and weed HTV.

Pressing the vinyl is the tricky part if the vinyl is close to the edge. A few tips - a mini iron, hair straightner, or a hand iron might give better control for pressing this item. If using a heatpress, angle the bag on the press so the strap next to the design is off the press or place a teflon sheet, or a tshirt folded inside the bag to raise the area that will be pressed. This will allow the pressure to be applied to the design without being blocked by the handle.

Press for the recommended amount of time and temperature. Remove HTV masking. In no time at all you have created a wonderful seashell bag. This bag is also useful for collecting rocks, putting small sand toys in, and for carrying sandy shoes. 

Have a Happy Summer!

PS Please remember to pin or share our blog post!