

It's so nice to welcome back Terisa Bostic, this weeks guest blogger! Terisa is showing how to make this personized 'Color Your Own Tote Bag!' So let's dig in with Terisa below!
SuppliesItems listed with an * are clickable links to the products
* Sturdy Canvas Tote Bag with Handles (Natural color)
* Black Heat Transfer Vinyl
Cutting Equipment - Used here Silhouette Cameo
* Sturdy Canvas Tote Bag with Handles (Natural color)
* Black Heat Transfer Vinyl
Cutting Equipment - Used here Silhouette Cameo
Cutting Mat and weeding tools
Heat Press or Iron - Cricut EasyPress Used
SVG or other digital design


Heat Press or Iron - Cricut EasyPress Used
SVG or other digital design

Use the font selection tool, type in the name you will be putting on the bag. It is best to select a font that is thick and without out any swirls or flourishes. For this design, I selected Franklin Gothic Heavy.

Next you want to create an offset that will allow you to cut the outline of the letters. This gives the “coloring book” effect to your finished item. After typing the name, select the font and right click. A menu option will pop up. Select Offset.

The offset menu comes up. Select Internal Offset and in the distance field type in 0.035. Then click Apply. You can play around with this number and create a thicker or thinner line, depending on what look you desire. Depending on the font selected, you may have to adjust due to the shape of the letters. If the offset is too large, your letters won’t cut properly.

Select your design that you wish to use to complement the name. I selected a design I already had in my library from Silhouette Studio.

Highlight the design and then right click to bring up the menu. Select Offset.

Then click Internal Offset and change the distance to 0.025. Click Apply.

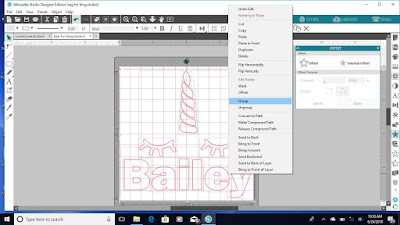
Right click and drag the cursor to include both the design and the text. Then right click and select group. This brings your two designs together as one group.

Since we are cutting on Heat Transfer Vinyl, we need to reverse the design. Highlight the design and right click. Then select flip horizontally.

Your design will be reversed on the screen.

Place HTV vinyl on cutting mat with the clear/shiny side sticking to the mat. Place in cutting machine. Click Send in the upper right corner. Under material, it should say heat transfer material. ( Mine shown in the picture is incorrect.) Click Send.
Remove vinyl from machine when cutting is complete. Weed design by removing the larger center part of the design. The part you will need is the thin outline on the outside of the design.

The canvas bag will likely be a bit wrinkled when you remove it from the package. Give it a quick press to remove the wrinkles before placing the vinyl.

Center your cut out vinyl on the bag, with the sticky side down.

Place sheet of pressing material on top of the design. I use just regular kitchen parchment paper.

Set your heat press to 305°C for 30 seconds. Apply force to the heat press and apply to each area of the design.

When design is cooled, slowly remove the clear plastic from the design.

The design is finished and ready to color! For a permanent effect, you can use fabric markers or sharpies. For a temporary washable look, Crayola washable markers are perfect.
Thank you Terisa! What a great idea for your child or grandchild this summer, personalized party favors, activities bag, Sunday School tote, Mandala for adult coloring and so many other ideas.
Please consider pinning or sharing this article on your favorite social media!
Please consider pinning or sharing this article on your favorite social media!


No comments:
Post a Comment
Thank you for stopping by and spending time with us!
Be sure to share your thoughts or ideas on products you would like to see. Or share your creations made with Craft Chameleon products.