Wednesday, July 27, 2016

Acrylic Faux Sea Glass

This is a post that I wrote for the "Terri Johnson Creates Blog".

Faux Acrylic Sea Glass
Summer is in full swing now and if you are not lucky enough to walk the beach to collect sea glass, this tutorial is for you. Hello all, Jamie from Craft Chameleon here! Terri has graciously opened up space on her blog to share this fun technique.

What you will need for this project other than your Silhouette and permanent vinyl is as follows:
Paper Plate, 2 grades of sandpaper, nail file, double sided tape, translucent acrylic.


First, you will want to secure the coarsest sand paper down on the paper plate using your double-sided tape. The plate does three things. It keeps your sandpaper located; keeps your dust/sandpaper granules collected and keeps your sandpaper flat/level as to not create gouges.


Next, take the translucent acrylic and sand in a circular motion on the sand paper. Place your fingers on different areas of the acrylic to assure even sanding.

Do this for both sides. When the acrylic is evenly sanded, with the coarsest sandpaper, empty your plate, and replace with the least coarse. Repeat the sanding process.

When completed the acrylic will have a frosted appearance. However, the edges will still have a gloss finish. 

Quickly and easily, take the gloss off the edge with a nail file for your finishing step.


Wash with clear water and dry. Add your vinyl design and complete your project!

Monday, July 25, 2016

Tooth Fairy Bag


You don't want to miss out on these!!
Click here for these fantastic bags.


Friday, July 22, 2016

HTV on Acrylic Blanks


Hello all this is a blog post I wrote for the Silhouette School Blog. It has some good information so I wanted to share it with you all too!

Hope your summer has been full of celebrations. Jamie Omahen from CraftChameleon, here to show you how to make a quick, easy, smooth writing surface, and bubble free Guest Board perfect for any type of gathering!

Gorgeous wood signs for guest books are all the rage for weddings, baby showers, bridal showers, birthday party, bat mitzvah, bar mitzvah, anniversary, memorial service, house warming, grand openings, and family reunions.

 I love the concept and look of those boards but would rather have a smooth finish for the guests to write on, plus a permanent marker can be used and the nib will last much longer.

Enough chatter, let’s make one!

Supplies: 

*HTV with your design mirrored, cut, & weeded
*Wood sign or board

*Acrylic with 4 holes drilled – available from Craft Chameleon
  Note: Clear acrylic will not remain clear in a heat press however solid color or glitter acrylic works well.
*Heat press – heat 300 degrees, timer 5 seconds (settings may vary)
*Parchment Paper
*Scissors
*Hammer
*Decorative tacks or nails - availablefrom Craft Chameleon
*Old Towel
* Permanent Ink marker
*Item similar to a flat cookie tray or other flat metal tray
*Large heavy books to weight down the metal tray
* Optional – Power drill or Dremel type tool


You want to start by creating or opening a design and scale to size. Don't forget to mirror the
design since you will be cutting on Heat Transfer Vinyl.


Load your Heat Transfer Vinyl (glitter or smooth will work) on to your Silhouette cutting mat and cut the design. Weed it.


Cut the carrier sheet following around the heat transfer vinyl design. The carrier films leaves a slight impression, cutting the general shape of the design helps it disappear in the second press.


Place the htv design on the acrylic. Cover top and bottom of the acrylic with parchment paper. Teflon sheets are not recommended, as they impress a pattern on the hot acrylic.


The second press will finish bonding the vinyl to the acrylic and any lines made by the carrier sheet.

Press for 5 seconds at 300 degrees. Open press, carefully remove carrier sheet, recover with the parchment paper, and press again for another 5 seconds.


Wait! What is this photo of? Well I didn’t have a cookie sheet or heavy books so this was my work around.

After the second pressing, you will need to let your acrylic cool under something flat and heavy thus the flat metal sheet & books in the supplies list. Be sure to leave the parchment paper on both sides of your acrylic. 
Shown above, a flat metal plate with a heavy box under which is warm acrylic! The larger the longer it takes to cool


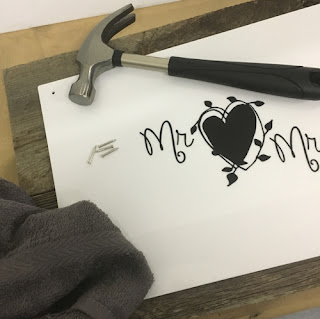
The final step is to attach the acrylic to the board using decorative tacks or nails. Depending on the type of wood used in your sign, pre-drilling pilot holes is a good idea. For the last few taps on the nail head use a folded towel over the area to avoid marring.


Pair the acrylic board with the permanent marker of your choice and the Guest Book Board is ready to go. I had so much fun making the first one, I made a second. In fact I love these so much I am sharing the files, so enjoy!


Friday, July 15, 2016

Wait What?! Flat Leon has been at it again!

Join Flat Leon Insider's Club (purple tab on the bottom left home page) Join Now!


Woohoo let's shop!
Plus now through the end of July he is slipping a free gift in every package!


Monday, July 4, 2016

Canvas Pillow Covers

Just in time for Fourth of July is a fun post using a $3.89 canvas pillow blank from Craft Chameleon.
After preheating the canvas blank, I laid out the text and the white background portion of the heart flag.

I did a quick press just to get the vinyl to stick to the canvas before adding the red flag stripe layer.

I lined up the red flag stripes to where I thought it looked good and did a full press with all the layers. Because the total design was larger than what fits on my 15x15 heat press, I had to press the text separately. After doing the full press with the heart flag and "America", I added the 1776 to the bottom and pressed that part of the design only.
Here is the pillow blank after all layers and design elements have been pressed on.
And here is the final product, stuffed and decorating our couch.


Sunday, July 3, 2016

Home of the Free

How lucky we are to live in a country where we are free?
Enjoy your July 4th!!

Friday, July 1, 2016

Leon Is Here!!

LEON IS HERE!!!! Get YOUR 10% Coupon!! 
Visit the new website! 100's of new shapes and each day a new acrylic shape will be added! www.craftchameleon.com