It's Fri-Yay and I can NOT contain my excitement about what I am sharing with you today! I am horrible about keeping secrets, have wanted to spill the beans on these babies for quiet some time but I finally get to share them with you today so get ready to Bling Your Ring! The rings are here and they are awe-some!
Yes they took a minute to get in but that's because Jamie and the crew at Punch Place Plus are seriously amazing about quality control and have high standards for the products they're selling. Which is a great thing and often hard to come by these days. This means that every time you make a purchase with them, you can do so knowing you are getting NOTHING but the best!
The rings will come in a "DIY Kit". You will receive five rings in your choice of finish as well as five acrylics in your choice of color.
*If you choose Gold Tone Rings and Gold Mirror Acrylics, you'll receive five gold tone rings and five gold mirror acrylics.*
Left to right: Sterling Silver Plate, Hypo-Allergenic, Gold Tone
*Note the difference in color of the Silver Plate and Hypo-Allergenic*
The rings are also adjustable! I know, right?!
The rings can be sized from a size six to a size ten.
You will simply wrap the ring around the sizer and adjust the loose piece around the inside of the stationary piece to fit your desired size.
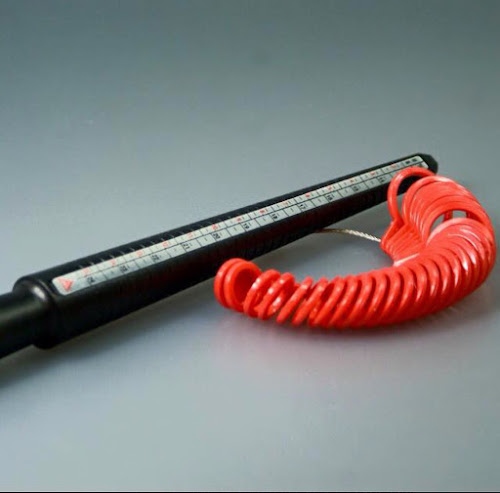
Yes, you'll also be able to purchase the ring mandrel as well as the sizing ring.
The sizer is to make sure your ring stays round when you're adjusting the size and the sizing ring makes sure that you and your customers get the right size.
Once you have it adjusted to the desired size, you can glue it in place or leave it to be adjustable again, and again.
I love that they have the bezel setting so the acrylic sits slightly in the ring and doesn't pose a hazard of catching on something or falling out. (Please see pics of how the mirror acrylics sit differently from the colored acrylics.)
To create and bling your ring, you're going to need the following items:
- Ring Kit
- Ring Mandrel & Ring Sizer
- E6000
- Vinyl to decorate your rings
You're going to want to apply your vinyl on your acrylic blank first because when you apply your blank it may shift a little and won't be straight if applied afterwards. Also it will be hard to get the vinyl onto the acrylic with the bezel setting on the mirrored acrylics (*see below for examples).
Tip: You can place a small piece of clear scotch tape over the top of your acrylic that has the vinyl on it so you don't get any glue on it-just make sure you wait 24 hours for the vinyl to cure before doing so.
Once your vinyl is applied you're going to apply the E6000 to the backside of our acrylic.
Please use it sparingly or it will ooze out the sides and onto the front of your acrylic.
Once you have a little E6000 place it all around the back side of your acrylic.
Now you can place the acrylic into the ring base.
Once the acrylic is in the ring base gently push down on the acrylic and the ring by placing your finger through the ring and your thumb on top of the acrylic.
Wiggle the acrylic in the setting a little and then make sure the acrylic is straight.
Allow to dry for 24 hours.
These next pictures are showing you the difference in how the mirrored acrylics sit in the bezel compared to the colored acrylic.
The acrylic discs measure 5/8" and are the perfect size to add monograms, a single initial, characters, team logos/mascots and more without being to small or to large.
I have seen these rings all over the Internet (go ahead, search for yourself I'll wait), they sell for well over $50+!
I know I was just as shocked but the good thing is, is that now we can create our own, have one in every style and color; pay less and still charge what they charge;)
Leave me a comment telling me what the first thing you'll create with your new Bling Your Ring Kit(s)?


No comments:
Post a Comment
Thank you for stopping by and spending time with us!
Be sure to share your thoughts or ideas on products you would like to see. Or share your creations made with Craft Chameleon products.