Wednesday, February 24, 2016

High Style | Low Cost Easter Baskets - Part 1

You don’t have to break the bank to get custom looking Easter Baskets
PART 1
BUNNY NESTS


 Acrylic glitter Easter bunnies


If you have several children, grandchildren or perhaps those in a nursing home, Bunny Nests are a great way to keep cost down.

All you need are your plastic bags, Easter grass (you get more than one nest per bag), ribbon to tie on bunny, a pompon for the tail plus your eggs or treats (all from the dollar store) and one of our darling bunnies!

 Acrylic Easter


If you are making these for Nursing Homes or other groups where you do not have all the names or time to personalize, pop on a tail and write your message on the back.

Be sure to subscribe for more high style | low cost ideas are on their way!

Tuesday, February 16, 2016

Fabric Cross

It seems like time sure is flying by, Easter is going to be here soon.
Today we are going to make a Fabric Cross.


Here are the items you'll need:
Faux Suede Fabric
Canvas or Wood
Hot Glue Sticks
Hot Glue Gun
Fabric Scissors
Thread or String


You're going to start by removing the plastic from your canvas.


Next, the hardest part is choosing which beautiful faux suede fabric color you want to use.


We are now going to measure your canvas or wood to decide on how wide and how long you're going to need your faux suede fabric.
I wanted my fabric to be 6-7 inches wide so I cut it that wide and left enough to wrap around the back.


Once I had my faux suede fabric pieces cut, I frayed the edges.


Frayed Edges

Now we are going to hot glue our edges to the back.


Run a little hot glue along the back of the wood and apply your faux suede fabric.


Grab your thread and pull it underneath your faux suede fabric.


Cut it off and now tie it into a knot.


Cut the strings up towards the knot.


Do the exact same steps with your horizontal piece of faux suede fabric.


Don't worry, it doesn't need to look perfect right now!

We are going to make a rolled flower so you're going to need to fold your faux suede fabric in a half a few times and cut a strip that is about 1-1.5 inches wide and about three to four feet long.


I start by turning the corner in so that I have something for the other fabric to hold onto.

Keep rolling the fabric into itself and hot gluing as you go.


When you get to the end and you have a half inch tail, roll it a little more and hot glue.


Add hot glue, then wrap your tail on the bottom of the flower.


Now you can move the pieces to get them how you like them onto your canvas by pushing them in or pulling them out.

Just be careful that you don't pull too hard and rip your hot glue off;)

Once you have them where you like them, decided where you want to place your flower and add a little hot glue to the center and place it onto your faux suede fabric.

These would be gorgeous in a bunch of different colors and as a focal cross wall!


Friday, February 12, 2016

Perfect Pairs

Hello all, it's Jamie with Punch Place Plus (soon to be Craft Chameleon). I shared this tutorial of our Perfect Pairs over on Melissa's blog (Silhouette School) and thought I'd share it here because although Valentine's Day is this weekend, the Perfect Pairs are perfect anytime!


There are a total of six sets of Perfect Pairs to choose from and they include everything you need to make five complete sets.


Other supplies that are helpful, to make the earring and necklace sets are:

  • Scrap pieces of permanent vinyl (1.5 x 1.5 inch pcs) 
  • Diamond tipped reamer
  • Two pair of bent nose pliers
  • Scrap cardstock (6 x 6 inches and smaller)
  • Tape or glue
  • Printer
  • Vinyl weeding /transfer supplies
Start by downloading and opening the cutting file in Silhouette Studio. *Don't resize the design or it will not fit correctly on the acrylic piece.  
If you're making all five sets, use the Replicate Tool to replicate the designs five times.

Choose your scraps, cut to fit and place on mat.


Tip: Turn on the grid function in the studio software. Click here for Silhouette School’s best tutorial because this step is mandatory for placing scraps correctly on the cutting mat. 
Tips for cutting small: Set speed to 1, make sure the blade is clean; vinyl is placed securely on cutting mat. 

Remove the protective covering on the acrylic charms and then apply vinyl. Clear transfer tape makes this easiest since you can see through it.

Create professional and perfectly placed holes in the vinyl with a diamond tipped reamer or bead reamer.  Insert into the hole and rotate to remove excess vinyl and leave a finished hole.


You don't need any special tools to make the earrings with the Double J earwires, which are included in the kit.
Slip the acrylic charm on the earwire, slide to the front until it is in position. Then push the ball towards the wire to ‘lock’ the acrylic piece into place.


For the necklace charm, using 2 pairs of bent needle nose or small needle nose pliers, open the oval split ring diagonally approximately 45 degrees. Load the chain and charm, then close using the reverse diagonal motion.


Jump Ring Tips: Give your jewelry a professional, secure connection by using an oval shape with the opening on a long edge in a heavy weight wire and by opening/closing the ring in the diagonal fashion shown in the tutorial. 
The Ampersand necklace pendant is now ready for the thin brown protective coating to be removed.


Now it’s time to print and cut the tags for the display card. If you're a Print and Cut beginner, don't skip Silhouette School's 101 tutorial.
Tips for successful print and cut: Color in your registration box and draw over the registration lines with a pen if your registration marks are not uber dark. Make sure to have plenty of light shining on/in the machine. 
After printing the file, delete, remove or use the 'No Cut' function for the verbiage. You only want a cut line around the border of the banner.


After cutting the patterned banner and heart card, use double-sided tape, glue stick or wet glue to assemble the three paper pieces.

Put the chain of the necklace in the plastic bag provided in the kit.


Thread the necklace on the card and tape the bag in place on the back side of the card. Flip it over and you've got yourself an adorable little set! I love how it's a play on the best friend necklaces we shared with our friends growing up! 


The Popcorn & a Movie is my perfect pair, which one is yours? 


Wednesday, February 10, 2016

Foiling the Frugal Way

Foiling has been popular for quiet some time but as we all know, crafting ain't cheap and everytime a new item, machine or technique comes out we can't just jump in with both feet and purchase it!

(Photo via The Frugal Crafter)

Lucky for us Lindsay, The Frugal Crafter is going to show us how we can do foiling the frugal way! 
Without a laminator, machine or toner printer, all while using the awesome Double Sided Adhesive that Punch Place Plus offers!


Isn't that, easy, inexpensive and awesome? 

Thursday, January 28, 2016

emoji-nal

They're everywhere! They're taking over your phones, your computers, your tablets and your homes to show your emotions. Well now you can get all is emoji-nal!


Punch Place Plus carries everything you need to create your favorite emoji or even get a little emoji-nal! (Valentine's Day is quickly approaching)!
 
To create these emojis you'll need:

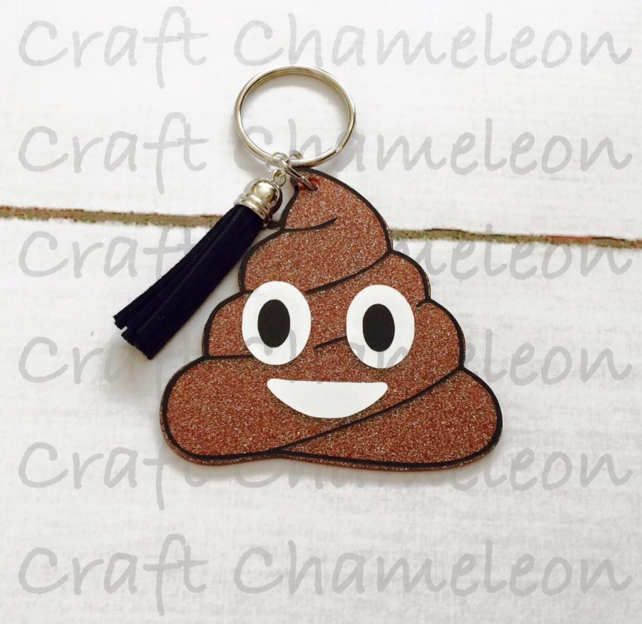
emoji poo

Vinyl
Transfer Tape
Optional Items:

Oval Jump Rings


The acrylic emoji poo are three inches and come in a brown glittered base.
So you all you need to do is add your vinyl to make them your own.
 
Please note that the back side of the acrylic will be a solid white. This is so the color is a lot richer, darker and has a lot more sparkle!
 
You're going to remove the protective sheet from your acrylic and clean them with soap and water and dry with a lint free cloth.
Cut your vinyl.

Once you've cut your vinyl to, you're going to apply your vinyl to the transfer tape and then apply it to your acrylic.

 
Now that you have it applied to your acrylic, rub the pieces of vinyl under the transfer tape to make sure that the vinyl is adhered to the acrylic really well.

(Small bubbles around the vinyl are no good, simply use your finger to rub them out.)

 
Once you've rubbed the majority of the bubbles out from around the vinyl move to the next step.
 
 
You're now ready to remove the transfer tape.

Pull (roll) the transfer tape back onto itself so that way if the vinyl isn't stuck to the acrylic well and starts to come up with the transfer tape, you can simply "roll" it back down and put the vinyl back down.Pulling the transfer tape off on an angle also helps in preventing bubbles.

 
Now we are going to layer the eyes onto our emoji poo, we are going to do it the same way we did the black parts above.
 
Simply place it where you want it, rub with your fingers until you feel the vinyl is adhered to the acrylic.
 
Pull the transfer tape off onto itself again making sure the vinyl is stuck to the acrylic.
 
Isn't that fun?!

Now we are going to add our small triangle bails.

Using your bent nose pliers, grab one side of the triangle bail and the other side with another pair or a pair of needle nose and push the right side of the bail away from you.
 
Once your small triangle bail is open, slip it onto your emoji poo and slip your silver tone split ring key ring onto it as well.
 
And then close it up pushing the right side (the same side you pushed away from you) of the bail towards you.
 
You're finished!

Or are you?

There are a few things you can do to add some feelings and emoji-on to your emoji poo or you could even make it a few friends!
 
 
I decided to add some tassels to mine.


I used the oval jump rings to attach the tassels.

 
And then attached the oval jump ring to the small triangle bail.
 
 
I did one with a black tassel.
 
 
And one with white.
 
 
You can also use the 2" neon yellow acrylics to make other fun emojis like Robin did to hers.


I love that she gave each one a different facial expression like all the different emojis have.


(Image courtesy of Robin Curry. Thank You Robin!)

 
I am simply in emoji-nol over these (in love)!
 
Wouldn't these be perfect the gift to give to your kids' classmates, your friends, coworkers or even your special Valentine?!
 
What emoji would you create?