

Father's day is a month-ish away so this tutorial by Jennifer Childress is the perfect gift for Dad. Crack out your Silhouette Curio and personalize this credit card size stainless steel bottle opener. Read on and enjoy!
As a fairly new Curio user, I know the new terminology can be a bit overwhelming at first! Luckily this is a good beginner project to get you started (and you’ll also end up with a useful Father’s Day gift to pop open those glass bottles)!
Supplies
*Items listed with an * are clickable links to the products on the website.
* Etching blade - used in the tutorial the Chomas etching tip, Craft Chameleon CB09 with etching tip also works, Chomas Precision Etching tip will also work.
* Stainless Steel Bottle Opener
* Stainless Steel Bottle Opener
Transfer Tape
Design of your choice - Font used in this one, SportsWorld link here.
Design of your choice - Font used in this one, SportsWorld link here.

We’ll start by creating a design or using a pre-made one. For this tutorial, I created one using the Sportsworld font and subtracting the “XXL” from an oval shape.

Once your design is created or pulled into Silhouette Studio, make the design a little bigger so you can see what is going on and to get a closer etch pattern fill. When we shrink it back down, we’ll have a really tight etch fill. Select the Emboss/Deboss panel. Make sure your design is selected then select your etch pattern under the Deboss header. I like to use the crosshatch pattern because it works nicely when etching. Once the pattern is selected, you’ll see some lines going through your design, but they’re spaced pretty far apart for etching.

Change the spacing to 0.005 inches. You should see some really tight lines display on the screen. Once you see this, click Release Emboss. NOW… we’re not done yet. Select your design again, select the crosshatch pattern again, change spacing to 0.005 inches, THEN change your angle to 45 degrees.
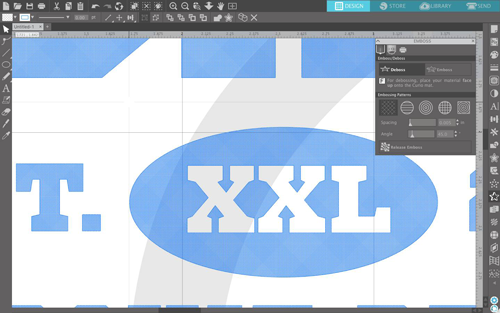
You’ll see even more lines in your pattern going in a different direction (this will make the etch more solid). Click Release Emboss, and size your image as needed for your bottle opener.

When I measured, my etching area was approximately 2.25 tall by 2.125 wide. I added the red square around it so I could see my work area and size my design appropriately. Now we’re ready to change our “Send” settings! Easy peasy, right?

For the Craft Chameleon bottle opener, the following settings worked great:
Material: Metal sheets- Etching
Action: Etch
Tool: Etching Tool
Speed: 3 (if you’re in a hurry, this can be upped a little)
Force: 33
Passes: 2
Platforms: 4 (I’ll explain more about this below)
NOTE: Make sure you delete or mark your square box as “No cut” since this only used for reference.
Material: Metal sheets- Etching
Action: Etch
Tool: Etching Tool
Speed: 3 (if you’re in a hurry, this can be upped a little)
Force: 33
Passes: 2
Platforms: 4 (I’ll explain more about this below)
NOTE: Make sure you delete or mark your square box as “No cut” since this only used for reference.

Now let’s get our machine ready!
How many platforms do we need? Well, let’s measure the thickness of our bottle opener. It is approximately 2 mm. We want the total height to be 6 mm, so we’ll use 4 platforms for this.

To hold the bottle opener on the sticky mat and to protect the mat from the etching dust, I put a layer of transfer tape on my mat (sticky side up)!

Place your bottle opener on the mat so that it matches the location on your screen. Since these are a pretty basic shape, I didn’t use a plastic template to hold it in place. Make sure you press down pretty hard so it’ll stick good.

Put your Amy Chomas etching tip in the machine.

Load the mat.
Press SEND in Silhouette Studio and watch the etching begin.

When your etch is complete, there will be some dust on the bottle opener and mat. Run it under some water and gently wipe away the dust. When you’re done, you’ll have a nice Father’s Day gift completely customized for the dad in your life!
Great tutorial Jennifer, thank you for sharing your expertise!


